By: Team AY1920S1-CS2103T-W13-3
1. Introduction
Welcome to StudyBuddyPro!
StudyBuddyPro is a desktop-based application with a Graphical User Interface (GUI). It is intended for students in the School of Computing at National University of Singapore (NUS) who prefer to work with a Command Line Interface (CLI).
StudyBuddyPro aims to lessen target users' revision time consumption without compromising the quality of studies. The application provides a centralized platform for them to revise using flashcards, take notes and generate cheatsheets.
This Developer Guide (DG) is written for anyone who wishes to contribute to our project. In here, you will find StudyBuddyPro’s information for set-ups, its architectures and its key features.
If you wish to know more details about StudyBuddyPro, please do not hesitate to contact us!
1.1. Callouts Signs
Do refer to the signs below that will be used across the documents for references. These will prove to be useful when you are reading this document.
|
Indicates information that are to be adhere as potential problems may be encountered if you are not careful. |
|
Indicates information that are crucial to understand so that you will be able to follow the flow of the document. Confusion may arise if you do not grasp the information here. |
|
Indicates information that are note-worthy. Do read them for more information and better understandings. |
|
Indicates additional information that are helpful. Fret not, tips can be good to know but are not vital. |
1.2. Syntax
Do refer to Table 1 below for the various syntax that will be used across the documents for references. These will prove to be useful when you are reading this document.
| Syntax | Usage |
|---|---|
|
Indicates technical terms like commands, classes and methods |
Indicates internal/external links |
These syntax will be used in any context across the document. Possible places that they may appear are in examples, explanations and descriptions. Take note of these syntax as they may have different meaning compared to normal texts!
For example, switch is a command for you to type in the CLI so that the function can be executed. However, 'switch' in plain text can mean the switch device itself or to switch amongst some things.
An example of switch versus 'switch':
-
…
switchto toggle between the features … -
… is able to switch between features …
2. Setting up
Do refer to the guide here to set up our StudyBuddyPro on your device(s)!
3. Design
The following sections will show how StudyBuddyPro is being constructed in details.
3.1. Architecture
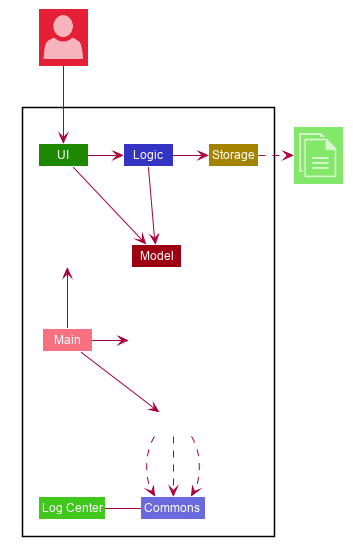
The figure below displays the high-level design of our StudyBuddy Pro.
The .puml files used to create some of the diagrams in this document can be found in the diagrams folder.
Refer to the Using PlantUML guide to learn how to create and edit diagrams.
|
The architecture diagram describes the relationships between the components, and here is a quick overview of each component:
-
At app launch: Initializes the components in the correct sequence, and connects them up with each other.
-
At shut down: Shuts down the components and invokes cleanup method where necessary.
Commons represents a collection of classes used by multiple other components.
The following class plays an important role at the architecture level:
-
LogsCenter: Used by many classes to write log messages to the App’s log file.
The rest of the App consists of four components.
Each of the four components
-
Defines its API in an
interfacewith the same name as the Component. -
Exposes its functionality using a
{Component Name}Managerclass.
For example, the Logic component in Figure 2 defines it’s API in the Logic.java interface and exposes its functionality using the LogicManager.java class.
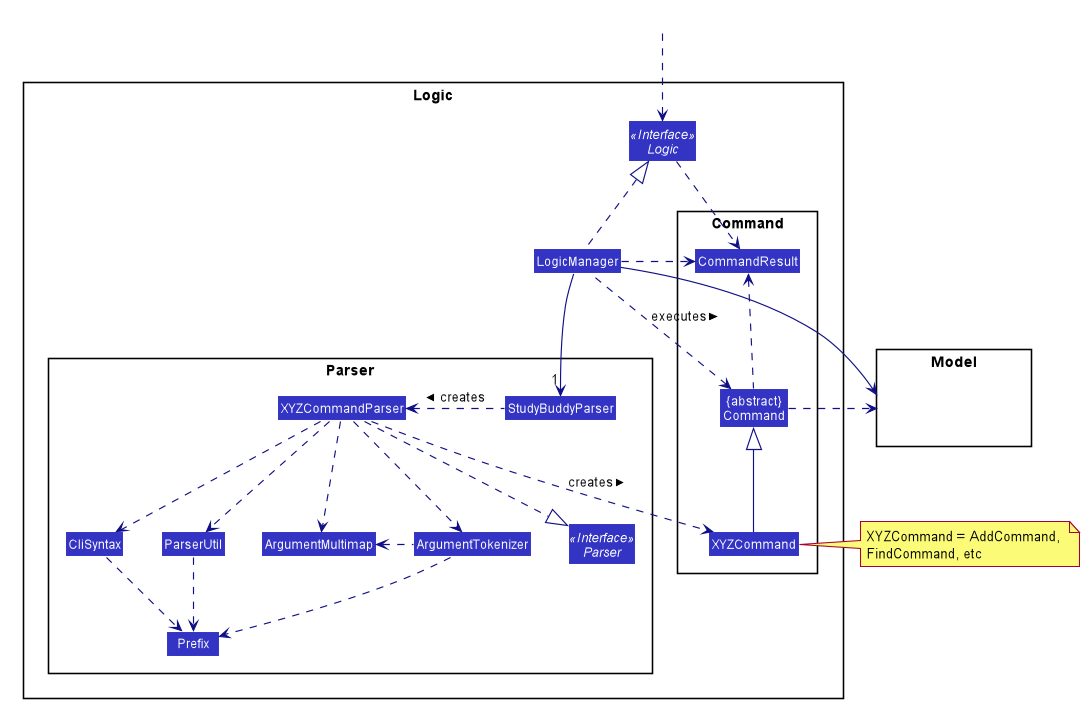
The Logic component’s class diagram shows the relationships between the components it interacts with. Also, it provides the flow of the actions with arrows.
How the application modes works?
The StudyBuddy Pro application has 3 modes for all the features: Flashcard, Cheatsheet and Notes.
The users use switch command to switch between the modes.
In each mode, the users will interact with only the modes' commands, unless it is a global command.
-
switch fc- switches to flashcard mode -
switch cs- switches to cheatsheet mode -
switch notes- switches to notes mode
The following figure is an activity diagram that describes the execution of the switch command.
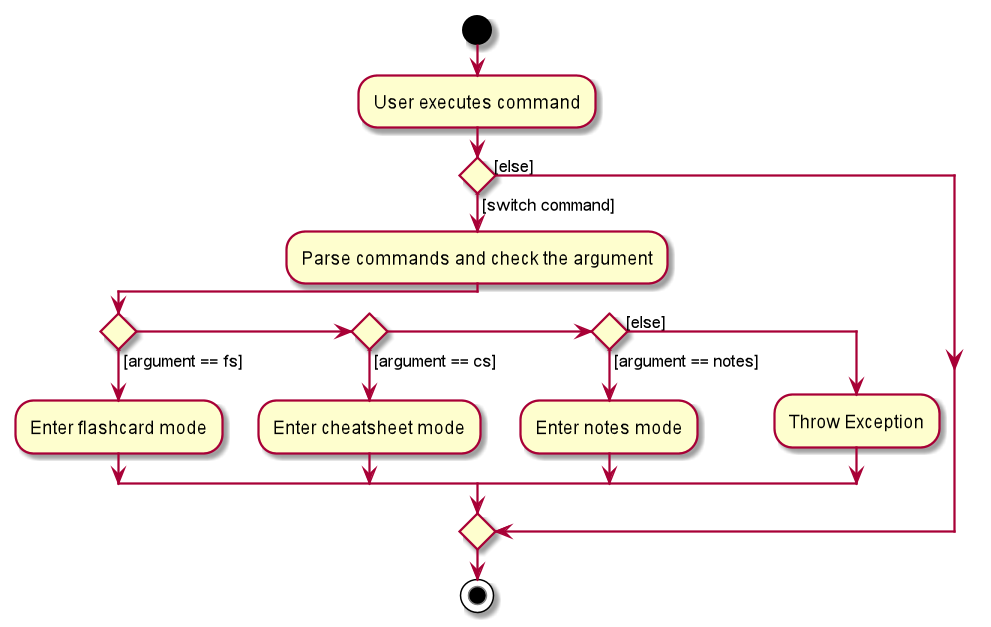
Switch command executionFrom the activity diagram above, it shows the logic flow of the actions taken when user executes the switch command. Also, it shows the checks taken placed to verify the command that was parsed.
How the architecture components interact with each other
The figure below shows how the components interact with each other for the scenario where the user issues the command delete 1.
|
Assuming that the user is currently in the flashcard mode. |
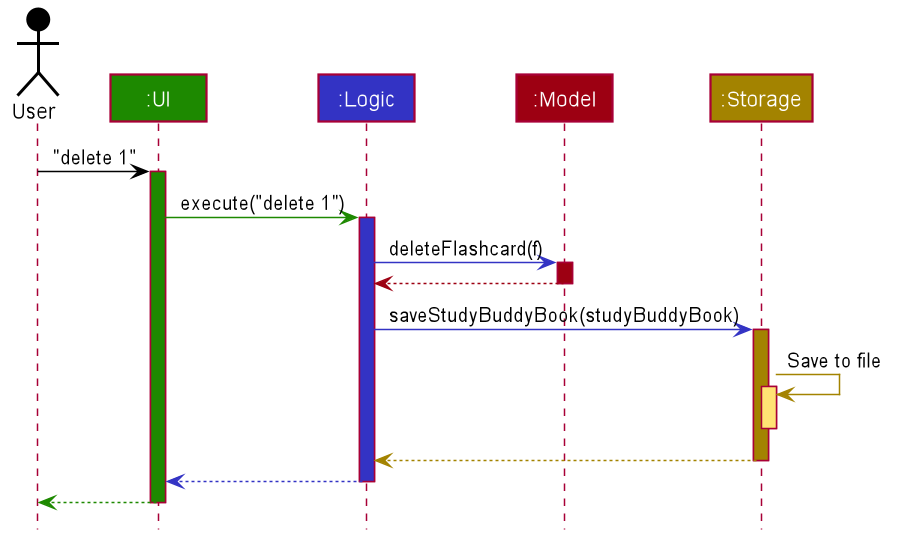
delete 1 commandThe above sequence diagram illustrates the relationships between each components in the StudyBuddyPro’s architecture. The sections below will give more details of each of those components.
3.2. User Interface (UI) component
This section describes the behaviour of the UI component in details.
The figure below portrays the internal structures of the UI components and their interactions.
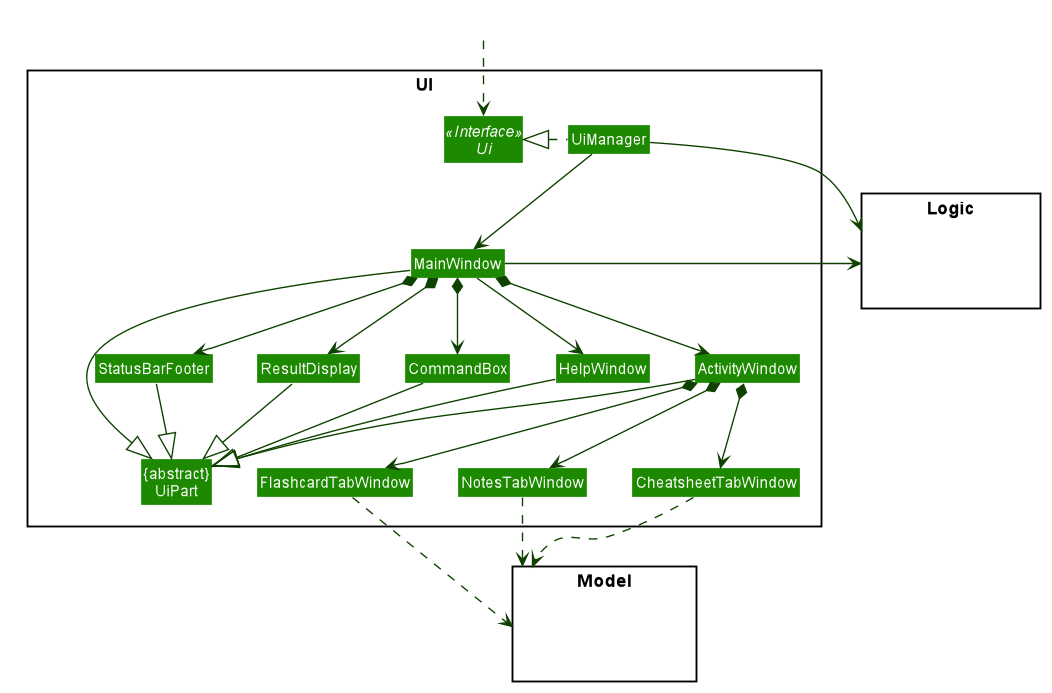
UI ComponentThe class diagram above draws out the relationships between the internal components and their flow of actions.
The segment below provides more details of the UI components and its API’s link.
API : Ui.java
The UI consists of a MainWindow that is made up of parts e.g.CommandBox, ResultDisplay, ActivityWindow, StatusBarFooter etc. All these, including the MainWindow, inherit from the abstract UiPart class.
The UI component uses JavaFx UI framework. The layout of these UI parts are defined in matching .fxml files that are in the src/main/resources/view folder. For example, the layout of the MainWindow is specified in MainWindow.fxml
The UI component,
-
Executes user commands using the
Logiccomponent. -
Listens for changes to
Modeldata so that the UI can be updated with the modified data.
3.3. Logic component
This section describes the behaviour of the Logic component in details.
The figure below portrays the internal structures of the Logic components and their interactions.
Logic ComponentThe class diagram above draws out the relationships between the internal components and their flow of actions.
The segment below provides more details of the Logic components and its API’s link.
API :
Logic.java
-
Logicuses theStudyBuddyProParserclass to parse the user command. -
This results in a
Commandobject which is executed by theLogicManager. -
The command execution can affect the
Model(e.g. adding a cheatsheet). -
The result of the command execution is encapsulated as a
CommandResultobject which is passed back to theUi. -
In addition, the
CommandResultobject can also instruct theUito perform certain actions, such as displaying help to the user.
The figure below is the sequence diagram for the interactions within the Logic component for the execute("delete 1") API call.
|
Assuming that the user is in the flashcard mode. |
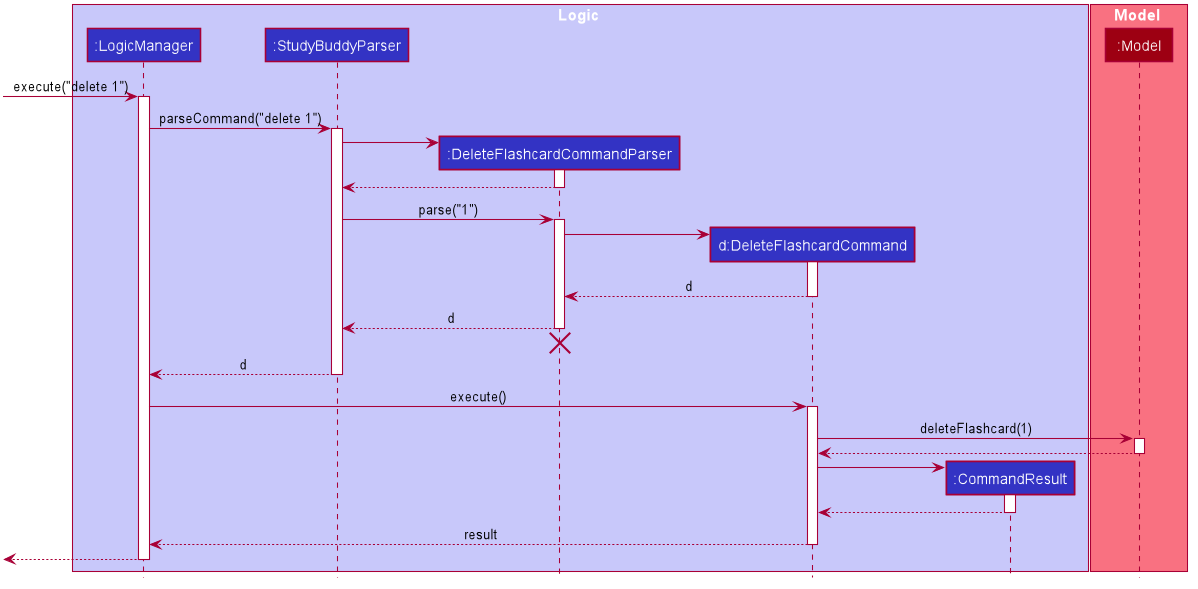
Logic Component for the delete 1 Command|
The lifeline for |
The above sequence diagram clearly portrays the execution of the delete 1 command with relevant methods being called. Also, it provides the action flow and return variables accordingly.
3.4. Model component
This section describes the behaviour of the Model component in detail.
The figure below portrays the internal structures of the Model components and their interactions.
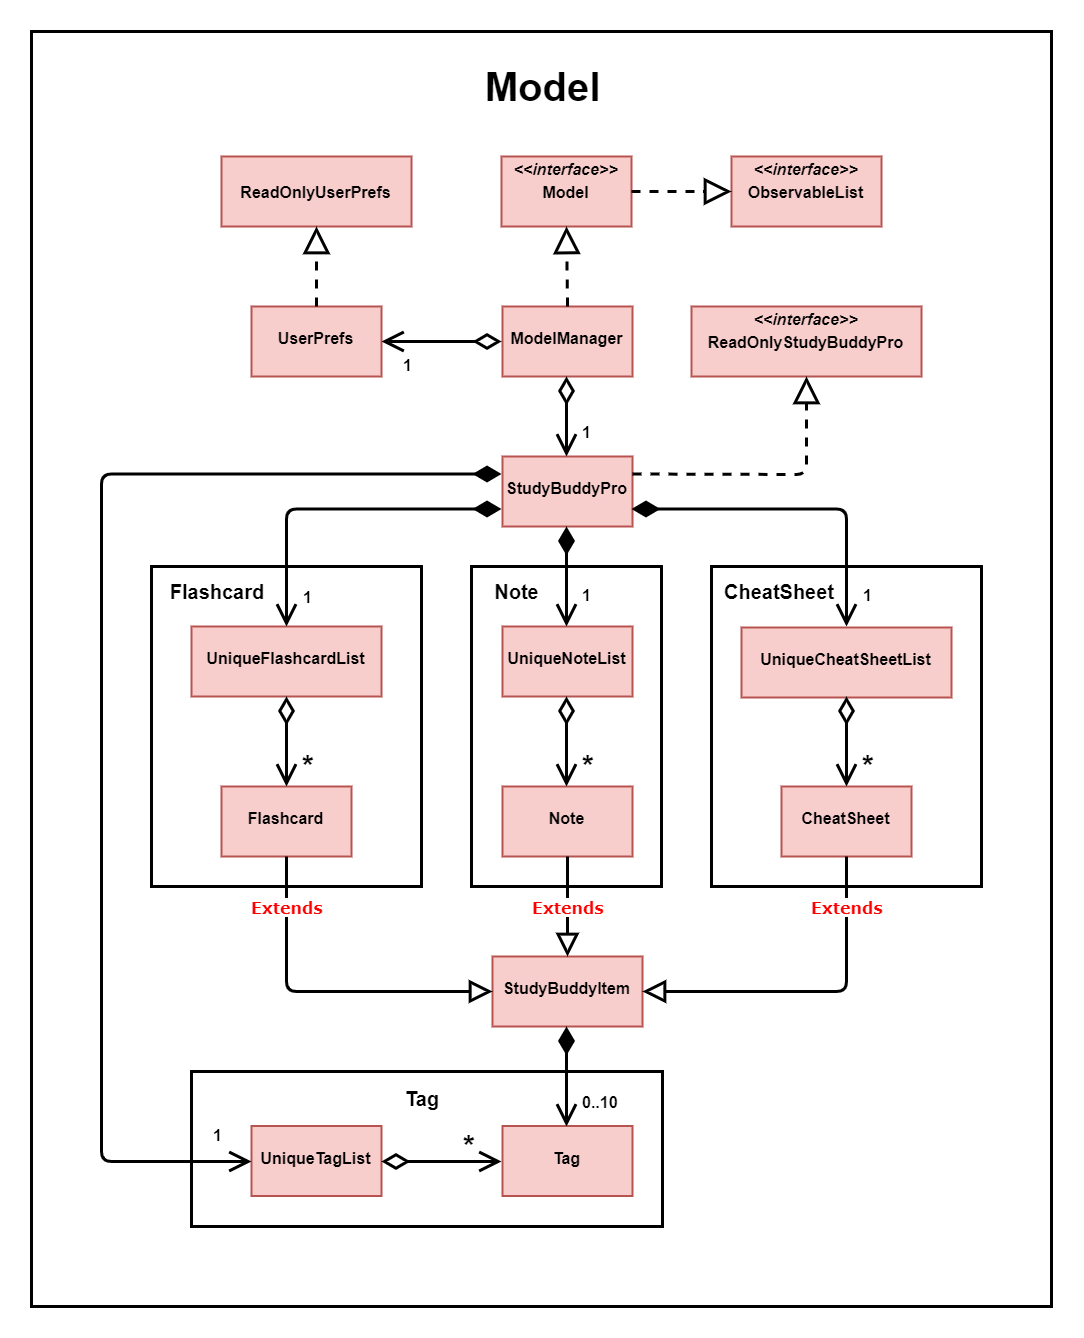
Model ComponentThe class diagram above draws out the relationships between the internal components and their flow of actions.
The segment below provides more details of the Model components and its API’s link.
API : Model.java
The Model,
-
stores a
UserPrefobject that represents the user’s preferences. -
stores the three main packages
Flashcard,Note, andCheatSheet. -
stores the StudyBuddyPro data.
3.5. Storage component
This section describes the behaviour of the Storage component in detail.
The figure below portrays the internal structures of the Storage components and their interactions.
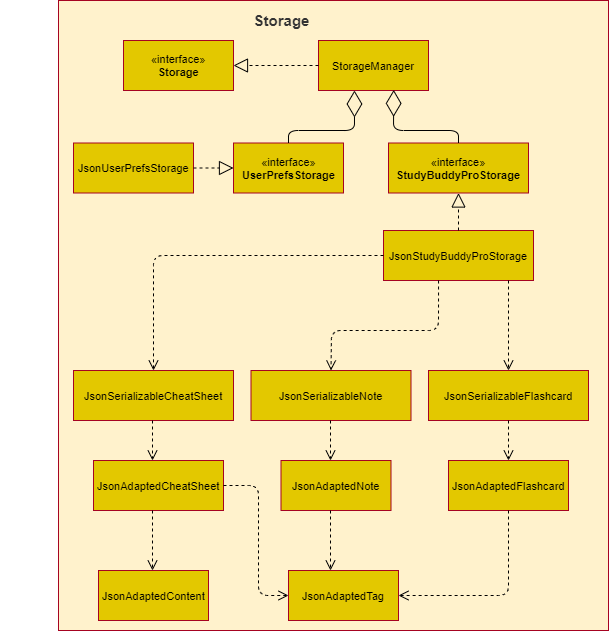
Storage ComponentThe class diagram above draws out the relationships between the internal components and their flow of actions.
The segment below provides more details of the Storage components and its API’s link.
API : Storage.java
The Storage component,
-
can save
UserPrefobjects in json format and read it back. -
can save the StudyBuddyPro data in json format and read it back.
3.6. Common classes
Classes used by multiple components are in the seedu.studybuddy.commons package.
4. Implementation
This section describes some noteworthy details on how certain features are implemented.
4.1. Logging
We are using java.util.logging package for logging. The LogsCenter class is used to manage the logging levels and logging destinations.
-
The logging level can be controlled using the
logLevelsetting in the configuration file (See Section 4.2, “Configuration”) -
The
Loggerfor a class can be obtained usingLogsCenter.getLogger(Class)which will log messages according to the specified logging level -
Currently log messages are output through:
Consoleand to a.logfile.
Logging Levels
-
SEVERE: Critical problem detected which may possibly cause the termination of the application -
WARNING: Can continue, but with caution -
INFO: Information showing the noteworthy actions by the App -
FINE: Details that is not usually noteworthy but may be useful in debugging e.g. print the actual list instead of just its size
4.2. Configuration
Certain properties of the application can be controlled (e.g user prefs file location, logging level) through the configuration file (default: config.json).
4.3. Tagging Feature
4.3.1. Implementation
-
The current implementation of StudyBuddyItems in StudyBuddyPro is such that it contains a Set of Tags.
-
The following objects of each individual feature shares similar Tagging behaviour, as shown in the class diagram below.
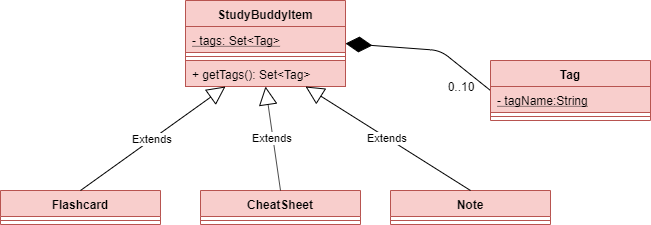
4.3.2. Design Considerations
-
As explained in the class diagram above, each StudyBuddyItem is limited to a total number of 10 tags.
-
The user is not able to create an item in StudyBuddyPro with more than 10 tags.
-
It is designed as such to prevent users from over-cluttering the result display when they view items that have too many tags.
-
To reduce confusion for the user, all tags will be converted to lower-case upon initialization.
Aspect: How tag predicates are implemented
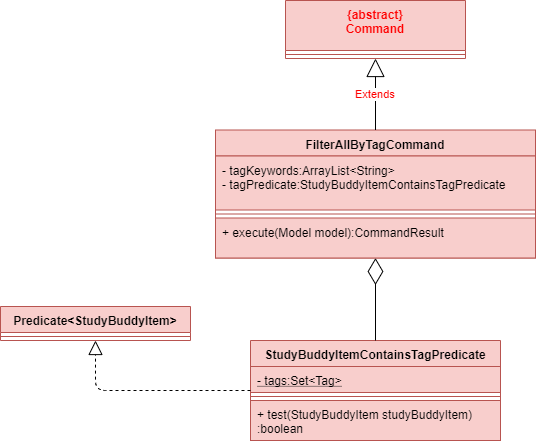
-
The above class diagram shows how tag predicates are being implemented.
-
The set of tags that is stored in
StudyBuddyItemContainsTagPredicaterefers to the tags specified by the user.
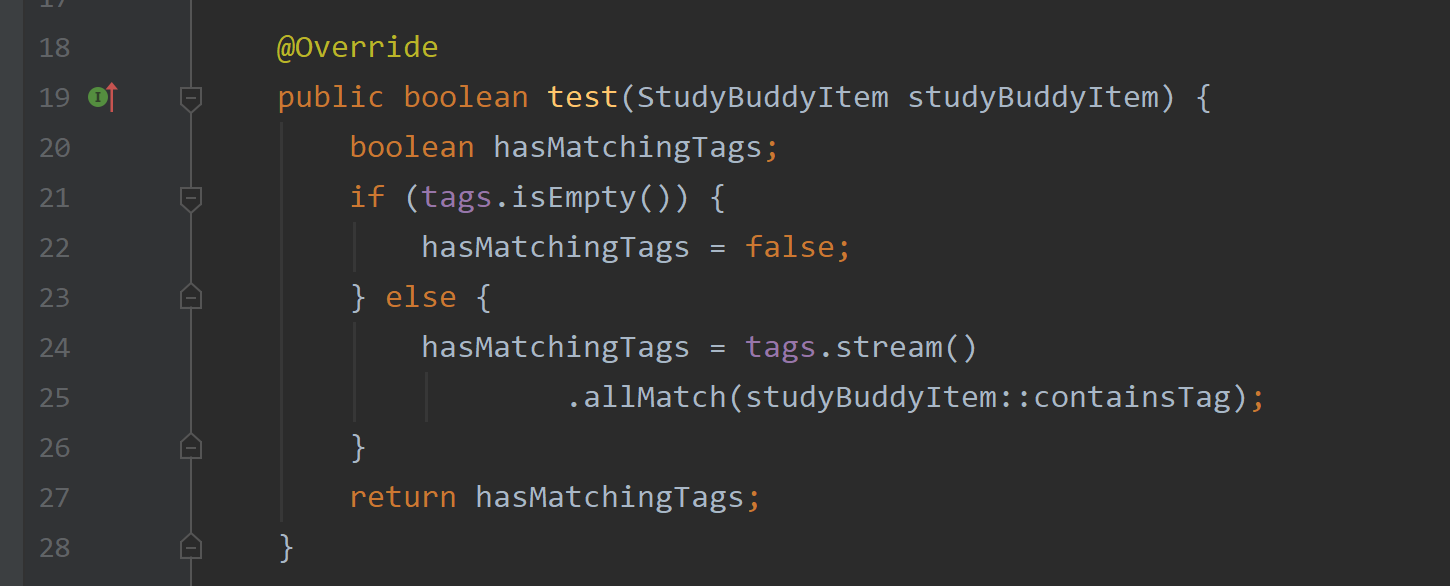
StudyBuddyItemContainsTagPredicate#test()-
The current implementation is that test() only returns true if all tags specified by the user matches the current Item.
-
As such, there will be more correctness when auto-generating cheatsheets and filtering flashcards, as seen in the following example.
-
If a user wishes to generate a cheatsheet and pull items with tags [cs2100] and [difficult], it would strictly only pull difficult CS2100 contents, and not pull other items that might have tags containing [difficult].
-
-
The rationale for this is that it would not make sense if a user wanted to create a cheatsheet for module [cs2100] and with tagged [midterm], that items containing tag [ma1521] (another math module) and [midterm] will be pulled over.
-
Such logic for filtering items by their tag is similar throughout the whole StudyBuddyPro.
4.3.3. Usage of Tags
a. To search for items
-
Inside each feature
-
The user is able to specify a tag name to get a list view of all the items with that specified tag in the mode they are currently in (e.g.
filter tag/cs2100).
-
-
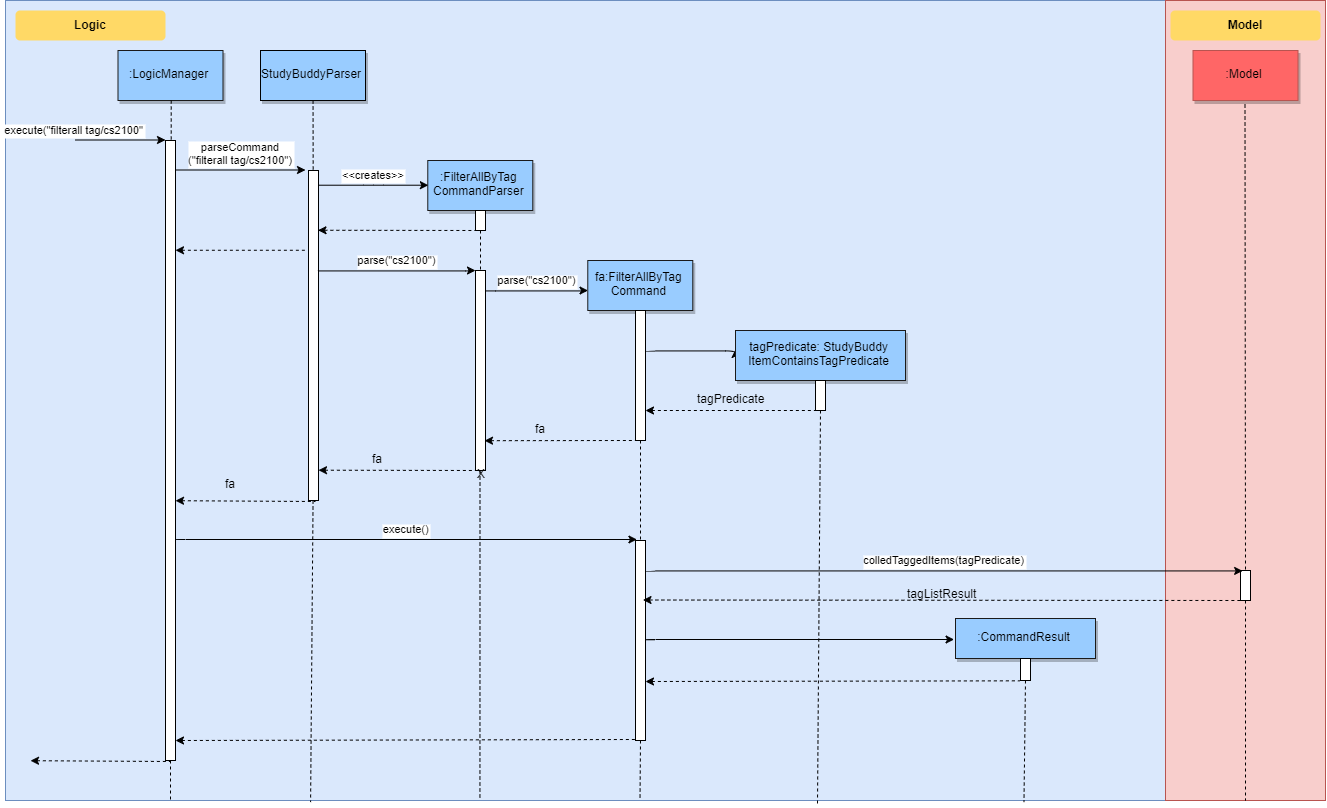
Searching using Tags globally
-
The user is also able to indicate a tag name get a list view of all the StudyBuddyItems across all 3 modes in StudyBuddyPro (e.g.
filterall tag/ma1521). -
The user can also call the global command,
taglistto get a listview of all tags in StudyBuddyPro.
-
-
Currently, the user is able to specify multiple tags in his/her query (e.g.
filter tag/cs2100 tag/difficult). -
If multiple tags are specified, only items that match all the specified tags will be listed.
-
The sequence diagram below shows how listing all items across StudyBuddyPro by a specified tag works.
b. For Auto-generation of CheatSheets
-
Upon adding a cheatsheet, the cheatsheet will make use of tags to automatically pull contents from other features of StudyBuddyPro.
-
StudyBuddyItems with tags that match the user’s input will be pulled over.
-
This feature will be further elaborated in the next section, Section 4.4.
c. For TimeTrial Mode
-
The TimeTrial Mode of the flashcard feature, will make use of the tagging feature.
-
It will do so by filtering out flashcards with tags that match the user’s input.
-
For instance, if a user wishes to revise only important flashcards, he/she could enter the following command,
timetrial important.
|
The syntax used here is slightly different. The user need not specify the |
-
The TimeTrial feature will be further elaborated in Section 4.5.
4.3.4. [Proposed] Future Improvements
-
Supporting deletion of Tags
-
Allow the user to delete a specified Tag.
-
All StudyBuddyItems must be updated in response to the deletion.
-
A proposed implementation would be to store all Tags in a Global Data Structure, and have each StudyBuddyItem reference to that Data Structure.
-
As such, we can apply an Observer pattern to update each StudyBuddyItem upon deletion of a tag.
-
4.4. Customizable Auto-generated Cheatsheet Feature
| All the operations assume the user is in the cheatsheet mode. |
4.4.1. Implementation
This feature has a two-step implementation. The first step is to auto-generate cheatsheet, and the second step is to enable removal of contents in the generated cheatsheet.
Step 1: Auto-generation
The auto-generation mechanism is used in the AddCheatSheetCommand during creation of the cheatsheet.
After creation, the cheatsheet is then stored in the studyBuddyBook.
It is involved in the following operations:
-
AddCheatSheetCommand#execute()— Creates the cheatsheet -
AddCheatSheetCommand#getRelevantContents()— Gets all the contents from flashcard and notes according to the tags specified
The first operation is exposed in the Model interface as Model#setCheatSheet().
The following figure shows a high-level view of how the auto-generation operation works.
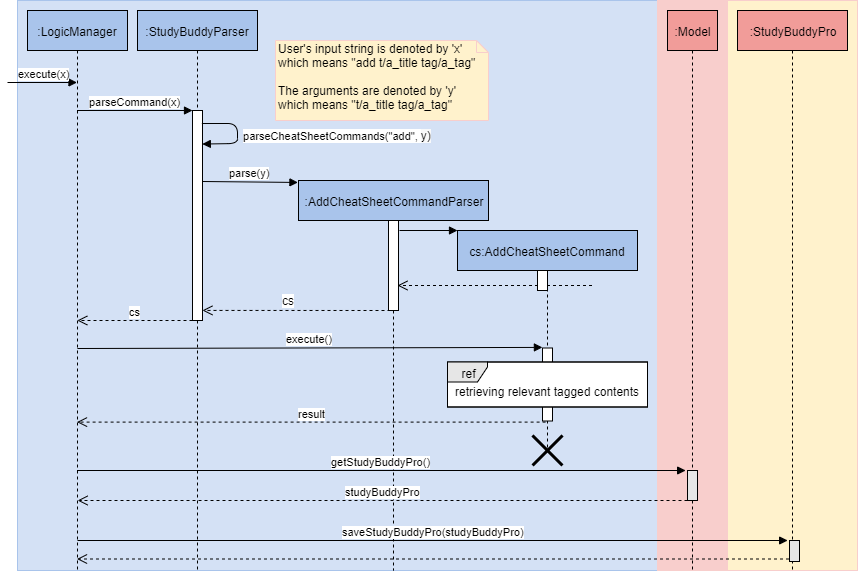
From the sequence diagram above, it portrays the relationships between the components to execute the creation mechanism. The figure below explains the details within the sequence diagram.
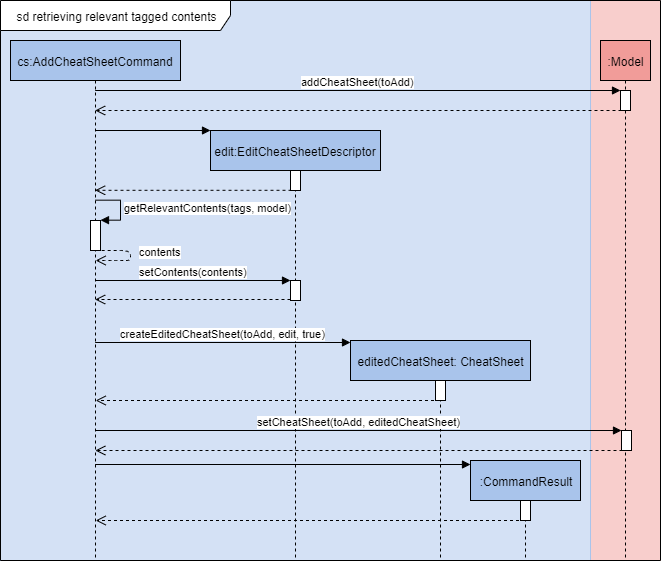
The above sequence diagram shows the complete action flow for the execution of methods. Here is a brief summary of the steps taken to create the cheatsheet:
-
A new cheatsheet object is created with the parsed title and tags.
-
Another new cheatsheet object is created with the relevant contents extracted according to the tags specified.
-
The first cheatsheet object is replaced with the second cheatsheet object while retaining its title and tags.
Different cheatsheet objects are created to ensure that the cheatsheet object itself is not modifiable.
Step 2: Customizing contents
The customization is based on the contents that the user wants to remove. The customization feature is used in the EditCheatSheetCommand during the editing of the cheatsheet. After the customization, the cheatsheet is then stored in the studyBuddyBook.
It is involved in the following operations:
-
EditCheatSheetCommand#execute()— Edits the cheatsheet -
EditCheatSheetCommand#updateContents()— Retrieves the contents to be retained in the cheatsheet
The first operation is exposed in the Model interface as Model#setCheatSheet().
The following figure shows the activity flow how the customization feature works using an example command called edit 1 c/1 c/3 c/7.
|
The index provided after |
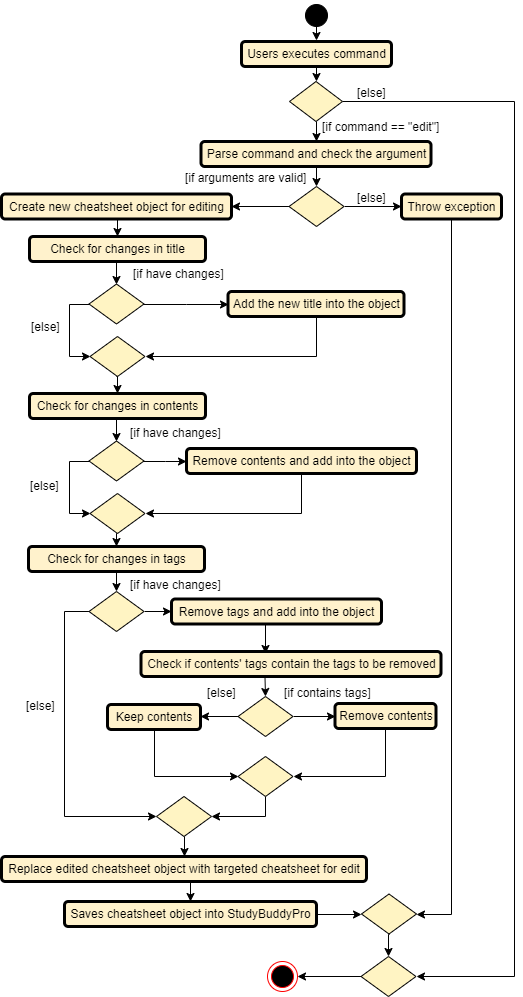
edit command for the removal of contentsThe activity diagram above shows the general flow of customization of cheatsheet feature. The changes for contents have to come first before the changes for tags. This is to ensure that the contents are still relevant to the tags specified. An example is provided below.
| Tag | Content |
|---|---|
tag1 |
content1 |
tag2 |
content2 |
tag2 |
content3 |
According to the above table, the system will be able to remove tag2 first before content2 if the order of removal is not followed. This may result in potential errors in the system as content2 may not be found or the position of it is being replaced with another content.
4.4.2. Design Considerations
Aspect: How auto-generation is implemented
-
Alternative 1 (current choice): Replacing the newly created cheatsheet with another cheatsheet object containing all the relevant contents
-
Pros: Retains the object originality and easier to implement.
-
Cons: Invoking the edit method to create a new cheatsheet object may be complicated and messy.
-
-
Alternative 2: Reformat the way the
addfunction works and abstract it such that it will be generalized.-
Pros: Codes may be cleaner and easier to understand.
-
Cons: Harder to implement. More abstraction and modifications have to be done. Might change the format of the system.
-
Aspect: How customization of contents is implemented
-
Alternative 1 (current choice): Places all contents that are not within the indexes specified by users into a new cheatsheet object and the targeted cheatsheet object with the respective changes.
-
Pros: Retains the object originality and easier to implement.
-
Cons: Large amount of contents may result in longer processing time as it loops to find all contents not removed. It is messier to comprehend.
-
-
Alternative 2: Reformat the way the
editfunction works and abstract it such that it will be generalized.-
Pros: Codes may be cleaner and easier to understand.
-
Cons: Harder to implement. More abstraction and modifications have to be done.
-
4.4.3. [Proposed] Future Improvements
-
Alerts users of possible duplications of contents
-
Allows users to gauge the size of the contents (whether if it fits in single-sided or double-sided A4 paper)
-
Allows users to export the cheatsheets
-
Allows users to add new tags into the existing cheatsheets
-
Allows updates of cheatsheet — Currently, contents are taken upon creation. Hence, any objects with specified tags will not be added into the cheatsheet after the creation of the cheatsheet.
4.5. Flashcards Time Trial Feature
| The following commands assume that the user is in the flashcard mode. |
4.5.1. Implementation
-
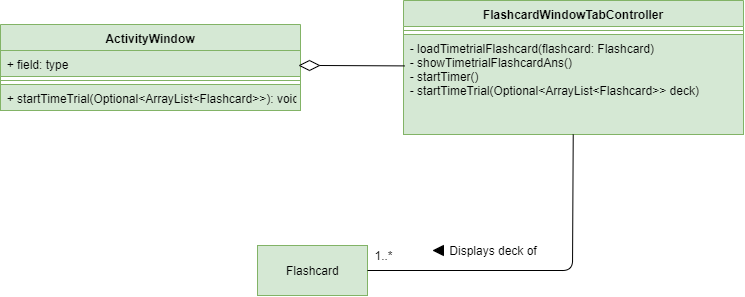
The time trial mechanism is facilitated by the
FlashcardTabWindowController, and mainly uses theTimeline,KeyFrameandKeyValueclass from the JavaFX package to support its functionality.
The following figure shows a class diagram of the relevant classes of the time trial feature.
-
Given below is an example usage scenario and how the time trial mechanism behaves at each step.
-
Upon initialization of the StudyBuddy and switching to the Flashcard window, the
StudyBuddyProParser’s function enum will be set to parseFlashcardcommands. -
The user executes (timetrial cs2100), and the
StartTimeTrialCommandretrieves a List of flashcards with the associatedTagthrough theModel#getTaggedFlashcards, which is then passed into theFlashcardTabWindowController. -
The
FlashcardTabWindowControllerthen calls theFlashcardTabWindowController#startTimeTrial, which in turns construct aTimelinewith the following added for 3 flashcards:-
A
KeyFrameto call theFlashcardTabWindowController#loadTimeTrialmethod, which displays the question of the flashcard on the window, with aKeyValuethat starts the timer on the screen. -
A
KeyFrameto call theFlashcardTabWindowController#showFlashcardAnsmethod, which hides the Timer and flashes the answer of the flashcard for a set period of time. -
A
KeyFrameis then added to the timeline to call theFlashcardTabWindowController#resetViewsmethod, which in turn empties the qnsTextArea and ansTextArea. [TO BE REFORMATTED]
-
The following figure shows the sequence diagram of when the command timetrial cs2103t is executed:
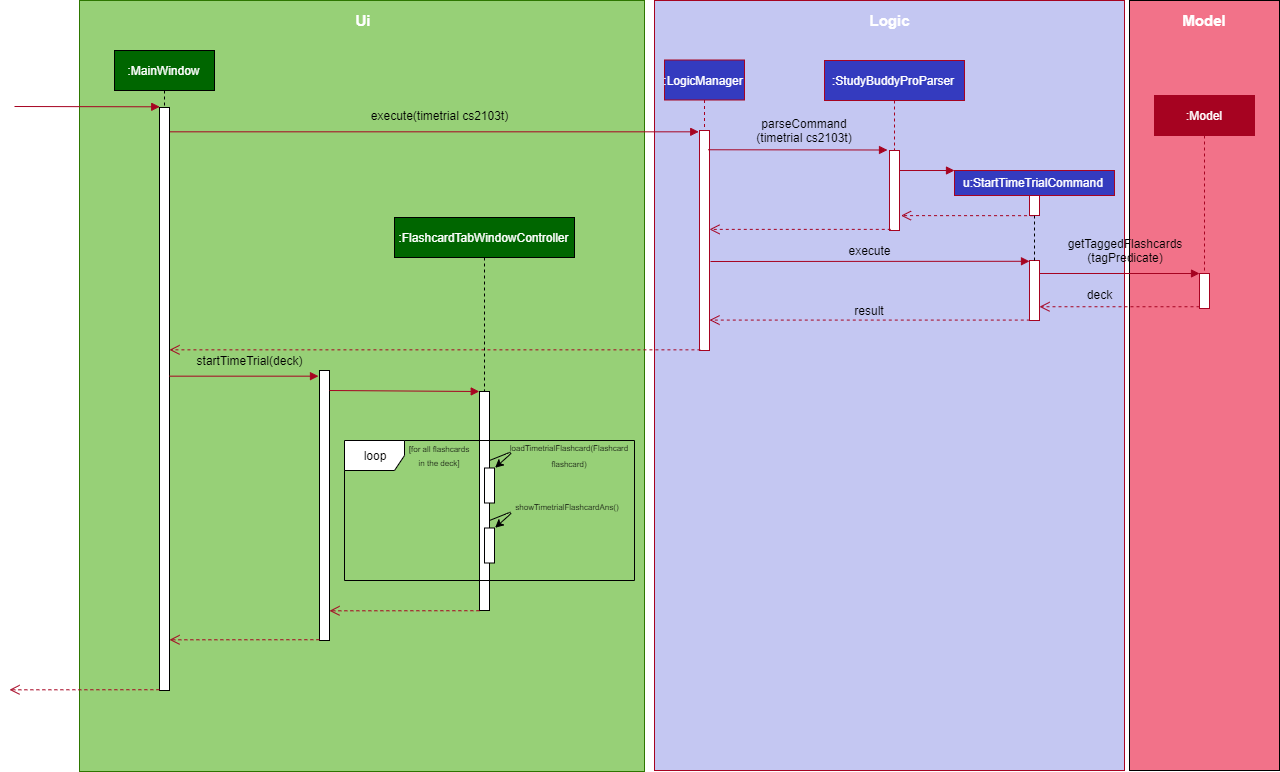
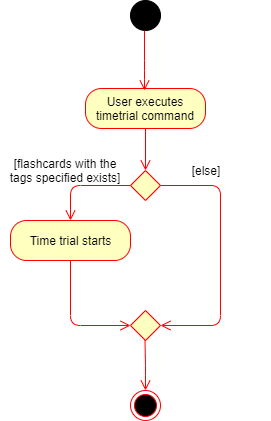
The following figure is an activity diagram that summarizes the flow of events when a user attempts to start a time trial as described above:
4.5.2. Design Considerations
Aspect: How the timetrial is implemented
-
Alternative 1 (current choice): Using the
TimeLineclass to set the timer object.-
Pros: Tidier and easier to understand.
-
Cons: Have to read up on the API and learn about the relevant classes such as
KeyFrameandKeyValue
-
-
Alternative 2: Looping
Thread.sleep()to set the timer-
Pros: Easier to implement
-
Cons: Code will be messier and harder to read
-
Aspect: How to continue the time trial
-
Alternative 1 (current choice): Each flashcard and its’ respective answer is displayed for a set period of time before the next flashcard
-
Pros: Easier to implement
-
Cons: Inflexible as user can only view the answer for a set amount of time
-
-
Alternative 2: Allowing users to input commands to display the flashcard answer / move on to the next flashcard
-
Pros: Better flow of time trial feature and improved user experience
-
Cons: Hard to implement
-
4.5.3. [Proposed] Future Improvements
-
Allowing users to set their own time limit for each flashcard in the time trial mode
-
Command will be inputted to set the duration of the timer for each flashcard
-
-
Allowing users to decide when to move on to the next flashcard
-
Question will still be shown for a fixed period of time, but a command will be required to move on to the next flashcard instead of just flashing the answer for a set amount of time
-
4.6. Remind Feature
|
For this section, a due flashcard refers to a flashcard that is due for revision today. In other words, the current date (according to the user’s system date) matches the date the flashcard was next supposed to be viewed for optimum revision. Similarly, an overdue flashcard refers to a flashcard whose view date for optimum revision was before the current date. Further details on how the optimum revision date is calculated is provided in this section. |
For this section the remind command refers specifically to the command itself,
while the remind feature encompasses the entire feature and all the
relevant classes.
|
4.6.1. Overview
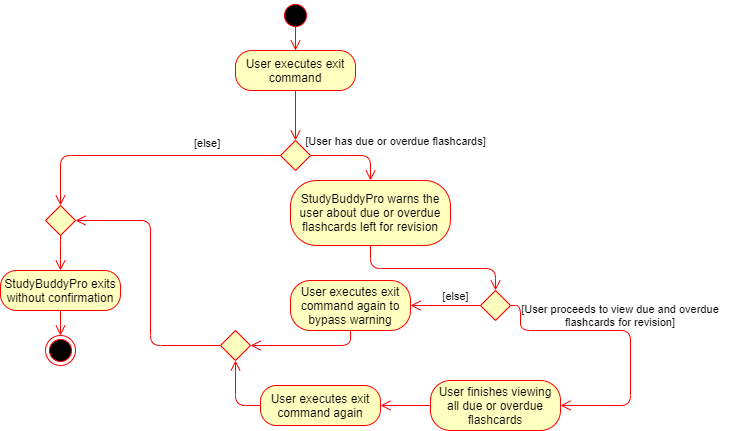
This feature aims to help the user stay on track with the user’s revision schedule through two
other sub-features. The first sub-feature is the remind command which helps the user
keep track of which flashcards are due or overdue for revision. The second sub-feature is
integrated with the exit command and is illustrated in the activity diagram below. For example,
a typical user may use the exit command to exit the application without realizing they still had
due or overdue flashcards left to revise. StudyBuddyPro will automatically warn the user about these
unrevised flashcards after which the user can decide if they wish to revise these flashcards or proceed
to exit StudyBuddyPro anyway.
exit command4.6.2. Implementation of Statistics class
In order to fully understand how the remind feature was implemented, it is important
to understand how a flashcard stores the relevant data fields it needs such as its last viewed
date. All the relevant statistics pertaining to each flashcard is contained within a Statistics
object. Each Statistics object also has a ScheduleIncrement, which helps keep track
of when the flashcard should be next viewed for optimum spaced repetition learning. The relationships between the
Flashcard, Statistics and ScheduleIncrement classes are summarized in the class diagram below.
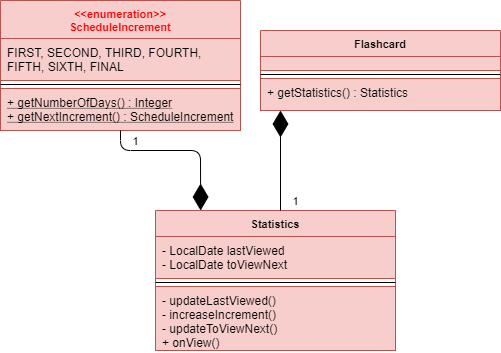
Flashcard, Statistics and ScheduleIncrement classes
There are currently 7 ScheduleIncrements implemented in StudyBuddyPro, each with a
corresponding integer value. This integer values represent the number of days the flashcard
should next be viewed (based on spaced repetition principles).
|
The interactions between the relevant classes can be illustrated through the following scenario:
Today’s date is 10/10/2019. Jim decides to view a flashcard which was previously viewed on 7/10/2019 and was scheduled to be viewed on 8/10/2019.
Step 1. Jim views the flashcard, either through a timetrial or by specifically finding the
relevant flashcard and viewing the flashcard’s answer using the view and show commands.
Step 2. When the relevant command is called, the Flashcard object’s Statistics#onView()
method is invoked to update its statistics.
Step 3. The onView() method calls its helper functions in the specific order shown in the
code snippet below. The order is significant as calling the updateToViewNext() method
before the increaseIncrement() method would result in the wrong ScheduleIncrement being
used to update the toViewNext attribute.
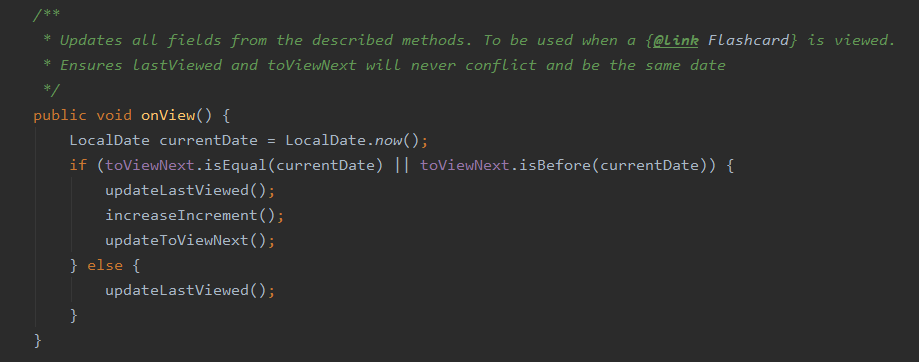
Statistics#onView()Step 4. In this case, the "if" clause of the code snippet above is triggered since
the toViewNext date (8/10/2019) was before the current date (10/10/2019).
Step 5. The various helper methods execute their relevant functions to update their
respective fields. For example, the lastViewed date is now updated to 10/10/2019.
4.6.3. Implementation of remind command
| The following commands assume that the user is in the flashcard mode. |
The remind command is facilitated by the RemindFeatureUtil class and extends
the abstract Command class as summarized in the class diagram below. This diagram
also provides a summary of the Logic components of the remind command.
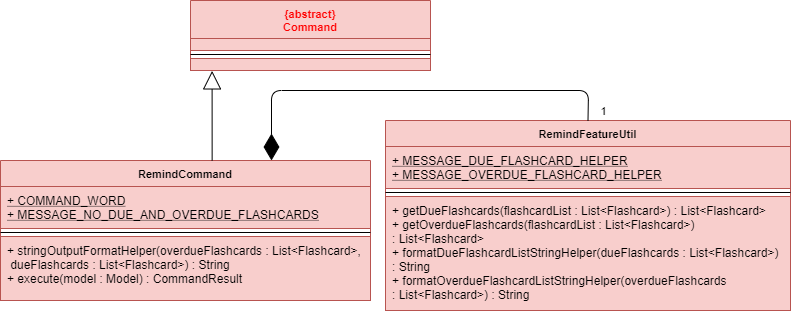
RemindCommandThe remind command also interacts with the Model component, specifically through indirect
interactions with each Flashcard object currently in StudyBuddyPro. This was explained
earlier through Figure 20.
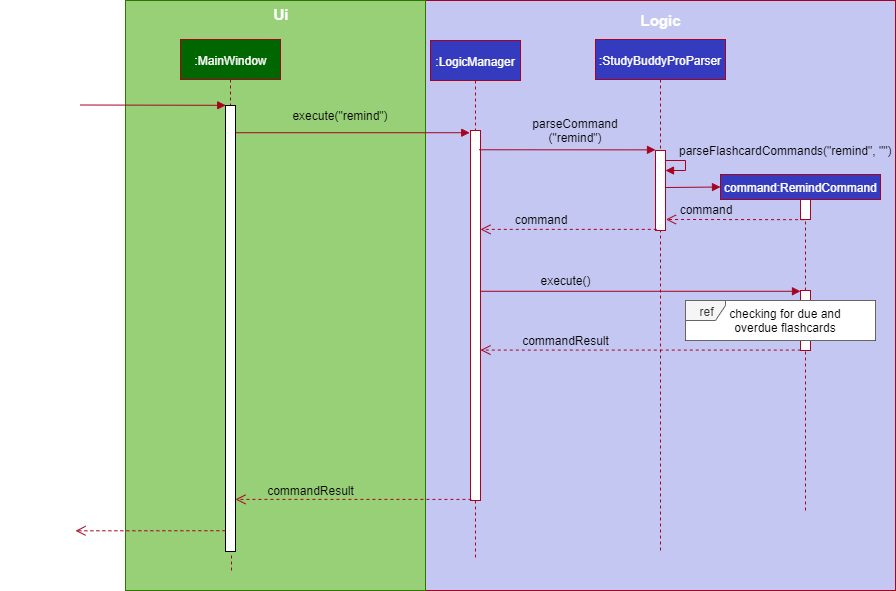
The following example serves to provide an overview of the high-level architecture involved for the remind command.
Step 1. The user types "remind" and executes the command to check what flashcards the user has due.
Step 2. MainWindow would call LogicManager#execute() to hand over control flow to the
Logic component.
Step 3. LogicManager parses the user input to determine which command is being called.
After determining that a remind command is being executed, the relevant RemindCommand
object is created.
Step 4. The RemindCommand object determines which flashcards are due and overdue, if any,
and returns the output packaged in a FlashcardCommandResult object.
Step 5. MainWindow extracts the relevant output to be shown to the viewer from the FlashcardCommandResult
and displays it.
These steps are illustrated in further detail in the sequence diagram below.
As is standard in this Developer Guide, red classes are part of the Model package, blue classes are part of
the Logic package, and green classes are part of the UI package.
|
remind command worksWith reference to Step 4 above, the implementation of how the RemindCommand object determines
which flashcards are due or overdue can be further examined. A broad overview is provided
in the sequence diagram below and explained in further detail below the diagram.
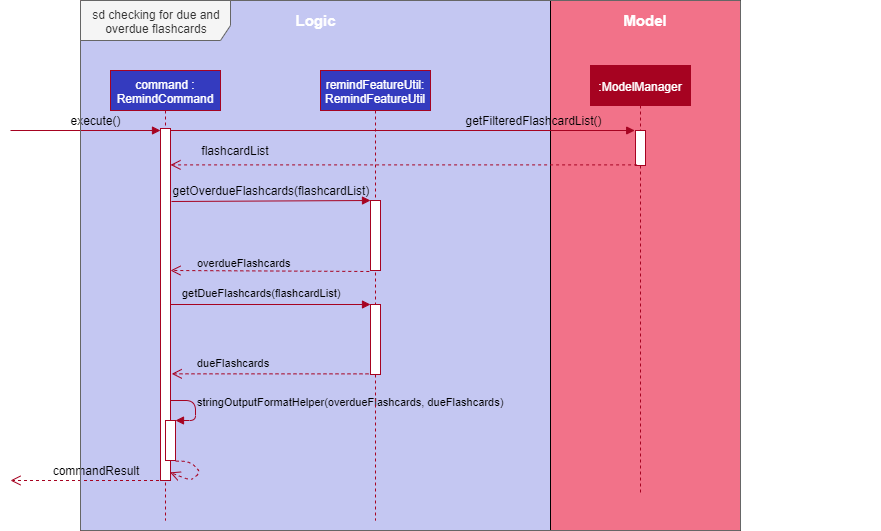
-
Whenever a
RemindCommandobject is created, it creates its ownRemindFeatureUtilobject. -
The
RemindCommandobject communicates directly with theModelManagerobject through the exposedModelinterface by calling upon theModelManager#getFilteredFlashcardList()to get the current list of flashcards in the application. -
The
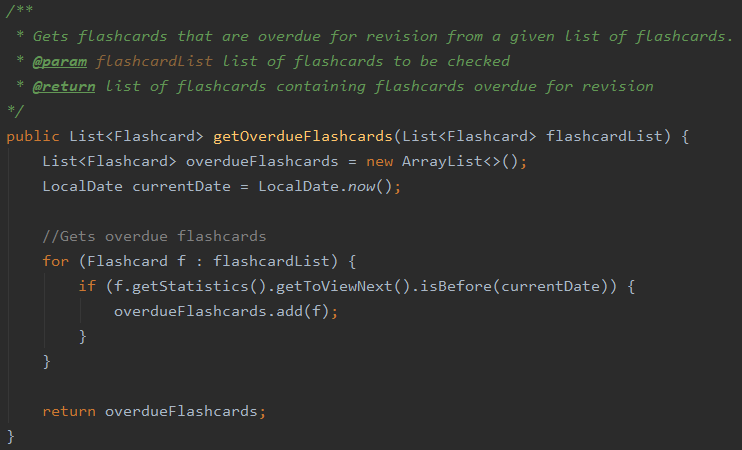
RemindCommandpasses the list of flashcards to its helperRemindFeatureUtilclass which retrieves due and overdue flashcards through theRemindFeatureUtil#getDueFlashcards()andRemindFeatureUtil#getOverdueFlashcards()respectively. -
As seen from the code snippet below, overdue flashcards are collected by iterating through the entire flashcard list and checking if each flashcard’s
toViewNextattribute is before the current system date. ThetoViewNextattribute is not stored in theFlashcardobject itself but rather in the flashcard’sStatisticsobject. A similar approach is adopted to check for due flashcards.
-
The two lists of due and overdue flashcards are formatted into a String and passed back through the
FlashcardCommandResultobject created.
4.6.4. Implementation of the exit command
The exit command is a global command and can be used in any mode, not just in the flashcard mode.
|
The exit command is implemented in a similar fashion to the remind command described
above. Each ExitCommand also contains a RemindFeatureUtil object it uses to check
which flashcards are due and overdue.
In addition, the ExitCommand object calls upon the CommandHistory object to check
if the last command inputted was an exit command through the CommandHistory#getLastCommand() method.
This was added to allow the double confirmation feature before the user can exit StudyBuddyPro
while still having flashcards due or overdue for revision.
4.6.5. Design and Implementation Considerations
The following describe two major considerations
Implementation Consideration: How to keep track of when a Flashcard object was last viewed?
-
Alternative 1 (current choice): Design a new
Statisticsclass and make aFlashcardobject store aStatisticsobject. TheStatisticsobject then keeps track of the flashcard’s last viewed date.-
Pros: Using a separate
Statisticsclass is more in line with Object-Oriented Programming (OOP) practices and means the same class can be adapted and used to track statistics of other objects in StudyBuddyPro in the future. -
Cons: Additional class adds additional maintenance and issues such as difficulty converting this class into a format that can be saved and read.
-
-
Alternative 2: Use an integer attribute field in each
Flashcardobject to keep track of how many times it was viewed.-
Pros: Easier to maintain: The addition of a new class increases overall coupling compared to adding a single new attribute field.
-
Cons: Bad OOP practice and makes it difficult to implement future changes. It may be unclear what the integer value represents and makes debugging more difficult.
-
Design Consideration: Should the user be given the option to toggle the exit command reminder?
-
Alternative 1 (current choice): User is not given the toggle option.
-
Pros: More in-line with target market. Since StudyBuddyPro is a revision tool the target market is likely to always want this feature and probably will not need to toggle it off.
-
Cons: Some users may face additional inconvenience when trying to exit StudyBuddyPro if they use StudyBuddyPro for other than its intended purpose. For example, a user that only wants to use the cheatsheet auto-generation feature may not care for the automatic reminder.
-
-
Alternative 2: User is provided with the toggle option.
-
Pros: More flexibility and customizability of StudyBuddyPro to suit each individual user’s needs.
-
Cons: Extra work required to implement the toggle feature. A user may toggle the reminder off when first using the application, and forget about the feature since it is now out of sight. Even if the user requires such an automatic reminding functionality in the future, they may have forgotten this feature existed.
-
4.6.6. [Proposed] Future Improvements
-
Improve the formula used for determining when flashcards should be revised.
-
We could take into account other factors such as user confidence level or number of times flashcard was answered correctly or incorrectly to create a more dynamic reminding schedule.
-
-
Introduce desktop notifications for the user.
-
As a user may not open StudyBuddyPro everyday, StudyBuddyPro can be integrated with the desktop system calendar to provide notifications when flashcards are due for revision.
-
4.7. Add Tags Within Notes feature
Notes are used in the creation of CheatSheet objects as well as in general use of StudyBuddyPro. This Add Tags
Within Notes feature allows for the addition of tags within the content of the Note, to allow more precise
highlighting and tagging of information.
| All the operations assume that the user is in the notes mode. |
4.7.1. Design Implementation of Notes
Notes contain a Title and a Content, with optional Tags and NoteFragments, as shown in the class diagram
below:
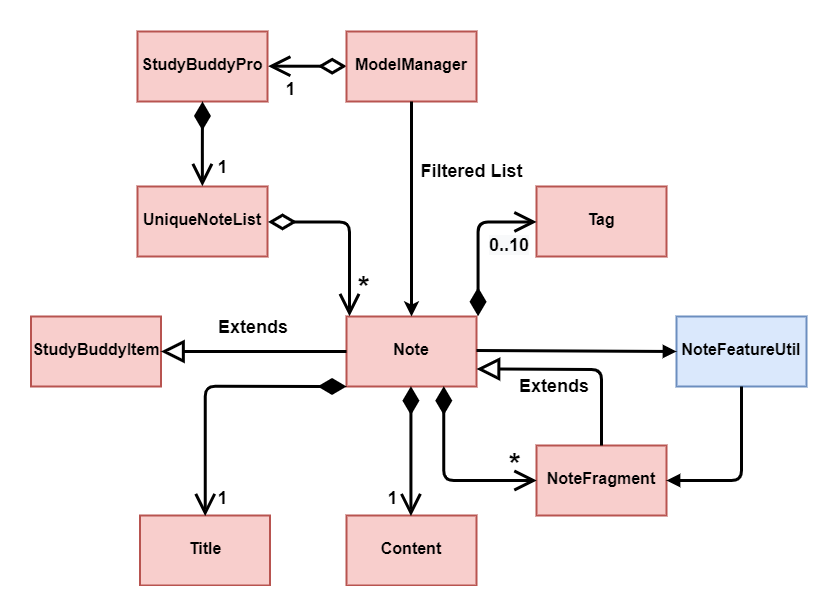
As is standard in this Developer Guide, red classes are part of the Model package, and blue classes are part of
the Logic package.
|
As the diagram above shows, Notes are StudyBuddyItems, and can contain any number of NoteFragments.
NoteFragment objects are used to represent the specific areas within a Note that have been tagged. Each tag
within a Note is referred to as a note fragment tag (which is represented by a NoteFragment object).
Note fragment tags should not be confused with Tags.
|
4.7.2. Usages of Notes
Notes can be used to:
-
Store information under a title
-
Categorize information via the use of
Tags -
Provide information to
CheatSheetsfor collation
Notes can currently be:
-
Added to
StudyBuddyPro -
Deleted from
StudyBuddyPro -
Viewed raw or cleaned from
StudyBuddyPro -
Viewed using
filterfromStudyBuddyPro
4.7.3. Design Implementation of the Add Tags Within Notes feature
The Add Tags Within Notes feature was implemented in the following way:
-
Creation of a
NoteFragmentclass that represents one tag within aNote -
Have each
Notecontain any number ofNoteFragmentsin a list -
Upon addition of a
Note, parse itsContentto check for any note fragment tags within it -
Create any required
NoteFragmentobjects and add them to the list in their parentNote -
Since
NoteFragmentsare contained withinNotes, when aNoteis deleted, itsNoteFragmentswill be deleted as well.
The following class diagram shows a more specific view of the relationships between the Note, NoteFragment, and
NoteFeatureUtil classes.
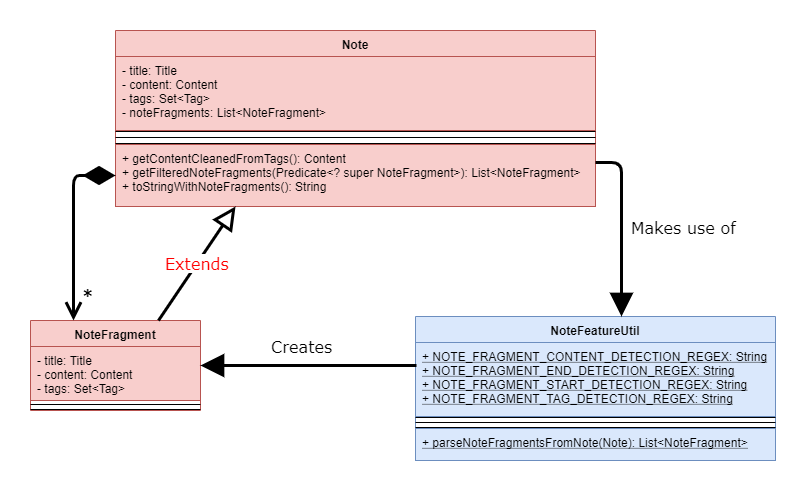
As shown in the diagram above, NoteFragments contain:
-
A
Titlethat is the same as their parentNote -
A
Contentthat is a substring of their parentNote -
Any indicated
Tagsthat are independent of their parentNote
NoteFragments are viewed or used in the following situations:
-
Viewable through the
filterandfilterallcommands -
Usable through
addcommands in cheatsheet mode (see Section 4.4)
There are four main methods that involve NoteFragments. They are listed below:
-
NoteFeatureUtil#parseNoteFragmentsFromNote(): Used byNoteto createNoteFragments. -
ModelManager#collectTaggedItems(): Used in thefilterallcommand. -
ModelManager#collectTaggedNotes(): Used in the notesfiltercommand. -
AddCheatSheetCommand#getRelevantContents(): Used to generateCheatSheets.
Out of these four methods, only NoteFeatureUtil#parseNoteFragmentsFromNote() is aware of the NoteFragment class.
The other three methods are only aware of the Note class.
The implementation of these four methods is shown below:
Implementation of NoteFeatureUtil#parseNoteFragmentsFromNote():
The method of parsing Content in NoteFeatureUtil#parseNoteFragmentsFromNote() relies on the use of Prefixes
around each note fragment tag. Each note fragment tag is specified with a start and end marker (represented by the
Prefixes '/*' and '*/'), and its Content and Tags are also represented with the Prefixes 'C/' and 'TAG/'.
Example usage:
add t/About Notes c/Notes can be /* C/highlighted TAG/highlight TAG/important */ if needed. tag/about
'C/' and 'TAG/' have to be used instead of the default 'c/' and 'tag/' because otherwise the Note would not be
parsed correctly (since only the most recent 'c/' tag is used for each command).
|
Expected output:
New note added:
    Title: About Notes
    Content: Notes can be /* C/highlighted TAG/highlight TAG/important */ if needed.
    Tags: [about]

Note fragment tags detected:
    Title: About Notes
    Content: highlighted
    Tags: [important][highlight]
A Note has been added with the Content of 'Notes can be /* C/highlighted TAG/highlight TAG/important */ if
needed.', and a note fragment tag with Content 'highlighted' and two Tags 'cs2100' and 'important'. The Note
itself is instead tagged with the Tag 'about'.
The sequence diagram below describes the process of adding a new Note that contains a note fragment tag:
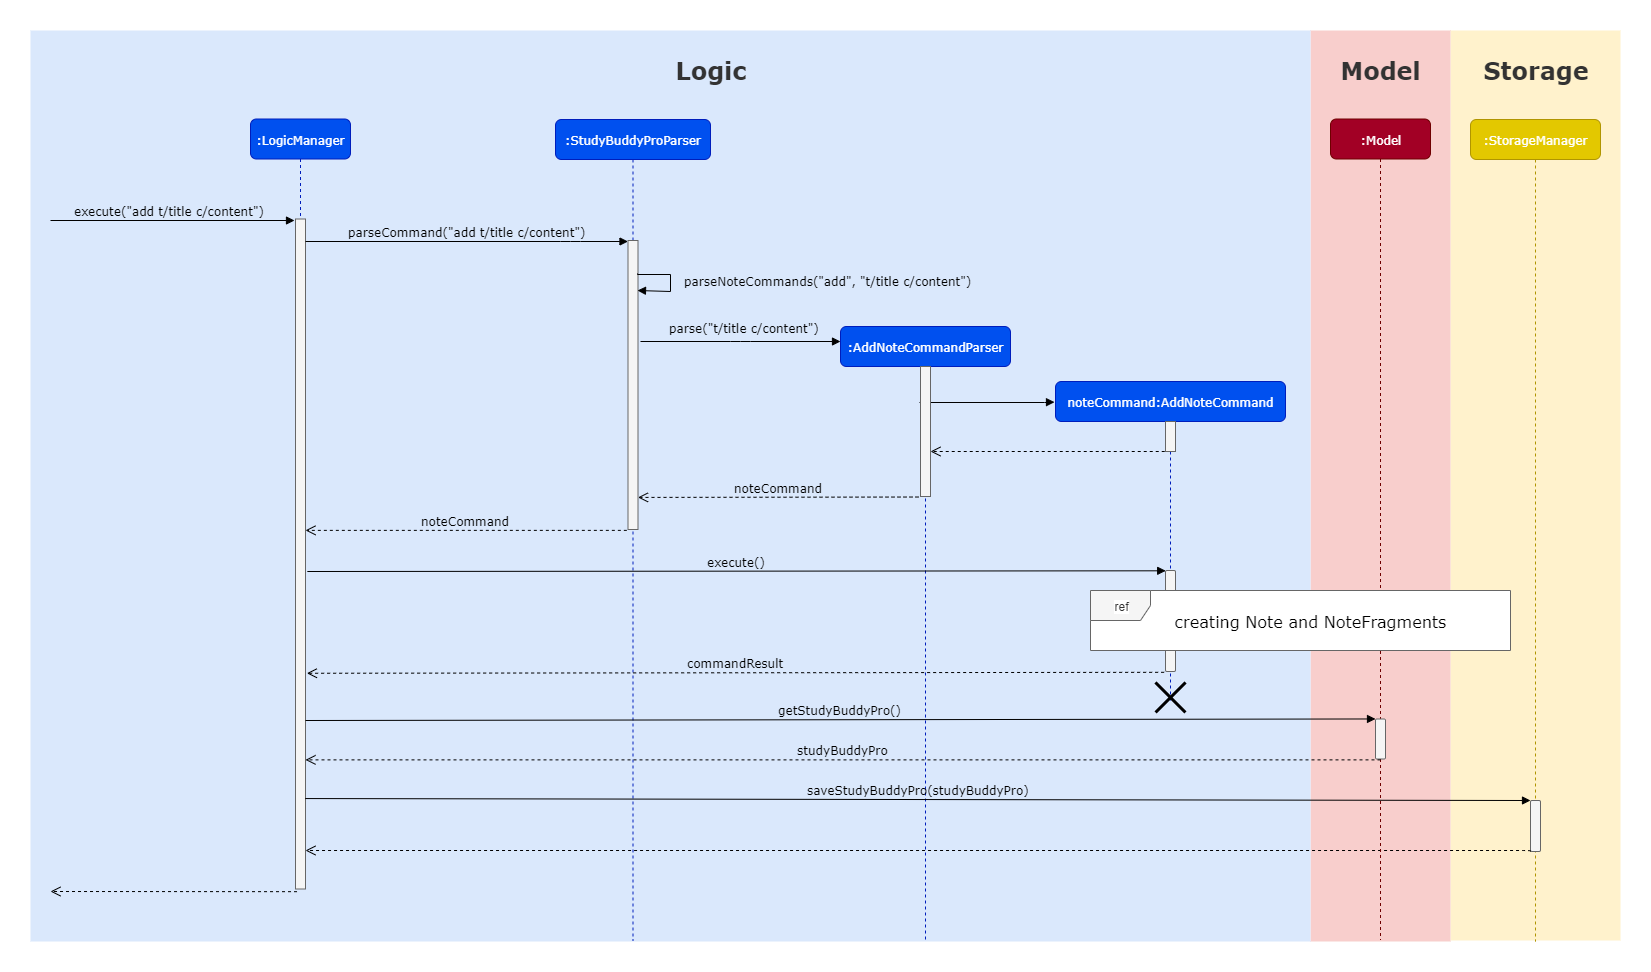
As seen in the diagram above, when an add command is entered by the user:
-
The
StudyBuddyProParseridentifies the user’s input as an add-type command. -
An
AddNoteCommandParseris created to parse the user’s input. -
Only the
Prefixes't/', 'c/', and 'tag/' are identified and parsed. -
NotesandNoteFragmentsare created (see next diagram for more details). -
The new state of StudyBuddyPro is saved via the
StorageManager.
The following sequence diagram elaborates upon the creation process of Notes and NoteFragments:
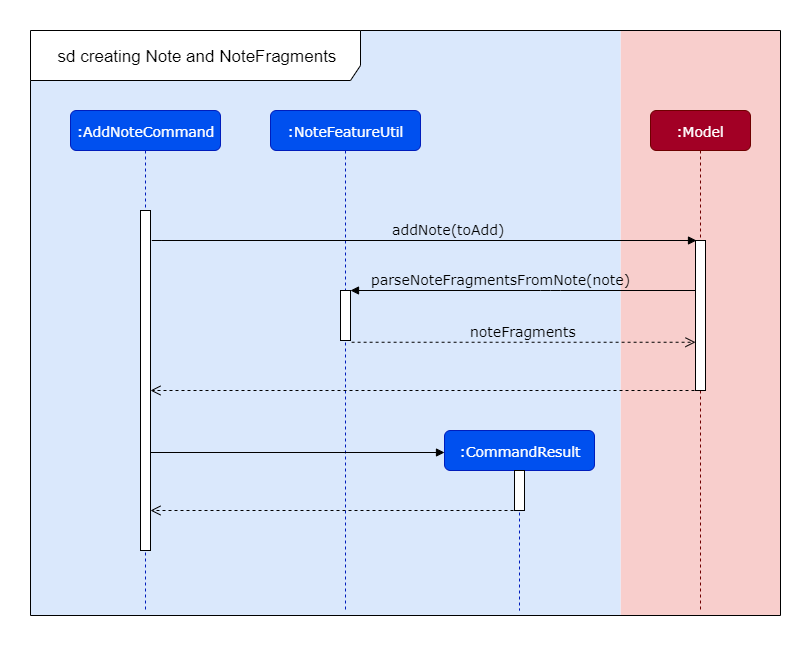
As can be seen from the zoomed-in diagram above, when an AddNoteCommand is created:
-
A
Noteis created with the desiredTitle,Content, andTags. -
The
Contentof theNoteis parsed for thePrefixes'/*', '*/', 'C/', and 'TAG/', usingNoteFeatureUtil. -
A
List<NoteFragment>is returned to theNote. -
A
CommandResultis returned to describe the AddNoteCommand’s result.
All four Prefixes must be present for the note fragment tag to be considered valid. Otherwise, an exception is
thrown.
|
Implementation of NoteFragments in filter command:
When Notes are filtered, the method ModelManager#collectTaggedNotes() is used, which checks for any valid tags in
NoteFragments within the Note as it checks each Note.
However, ModelManager uses the method Note#getFilteredNoteFragments() to achieve this, and therefore is not
aware of the existence of NoteFragments.
The separation between Notes and NoteFragments in the filter command allows for more finely-tuned viewing of
specific tagged details. For instance:
-
A small portion of a long
Notecan be tagged out as 'important'. -
Different parts of the same
Notecan be given differentTagslike 'CS2103T' or 'CS2100', even as the entireNoteis tagged under a larger category like 'CS'.
This behaviour of the filter command is distinct from that of the list command. In the list command,
NoteFragments are not listed. This decision is made because the list command already lists all Notes, and
therefore it would be unnecessary to also list all NoteFragments, as NoteFragments form a subset of Notes.
The differences between the two implementations can be summarized in the activity diagram below:
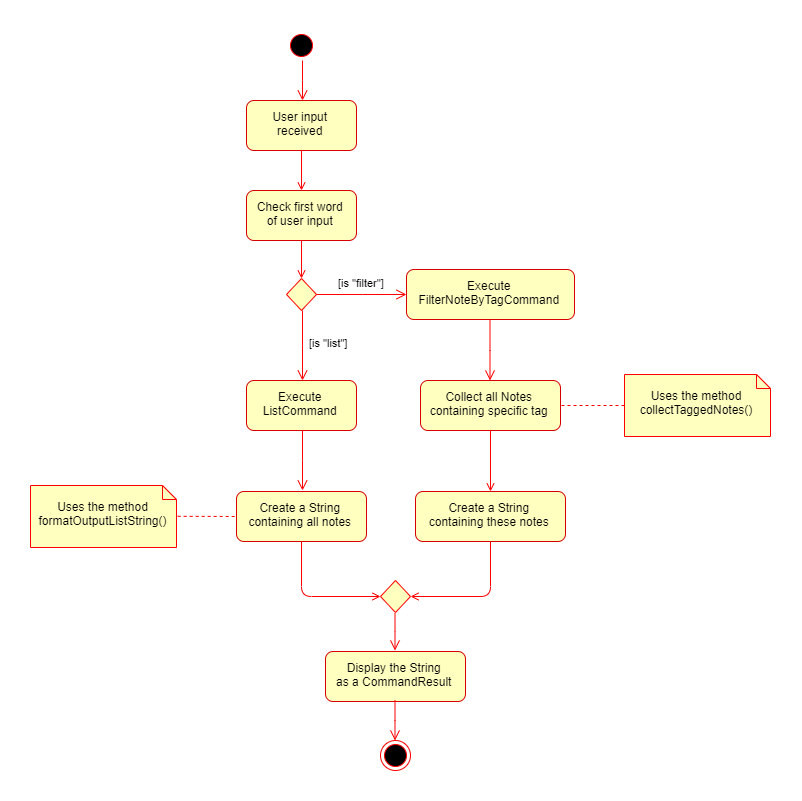
Whilst filter uses ModelManager#collectTaggedNotes() (as shown in the notes on the diagram above), list uses
ModelManager#formatOutputListString(), which does not check for any NoteFragments within Notes.
Implementation of NoteFragments in filterall command:
When all StudyBuddyItems are filtered, the method ModelManager#collectTaggedItems() is used, which performs a
similar task to ModelManager#collectTaggedNotes(), but also collects Flashcard and CheatSheet objects as well.
The reasoning for this decision is similar to that in the filter command.
Implementation of NoteFragments in add command in CheatSheets:
When a CheatSheet is created, the method AddCheatSheetCommand#getRelevantContent() is used to filter out all
Notes and NoteFragments that contain the specified Tags. AddCheatSheetCommand uses the method
Note#getFilteredNoteFragments() to obtain the filtered list of NoteFragments, and is therefore unaware of the
existence of NoteFragment.
Since the Tags stored in Notes and NoteFragments are independent of each other, they are filtered in the same
way as in the filter command. As a result, it is possible for a NoteFragment to be included in a CheatSheet
even when its parent Note is not.
4.7.4. Design Implementation of ViewNoteCommand
There are two Commands available if the user intends to view a particular Note: ViewNoteCommand and
ViewRawNoteCommand. ViewNoteCommand displays the Note to the user while hiding any note fragment tag syntax
from the content of the Note, while ViewRawNoteCommand displays the Note to the user exactly as it was inputted.
The main difference in the process of the two commands is shown in the activity diagram below:

As can be seen in the diagram above, the method Note#getContentCleanedFromTags() is used to obtain a copy of the
Content of the Note, and reformat it by replacing its note fragment tags with blank spaces.
The object diagram below elaborates on the process of Note#getContentCleanedFromTags():
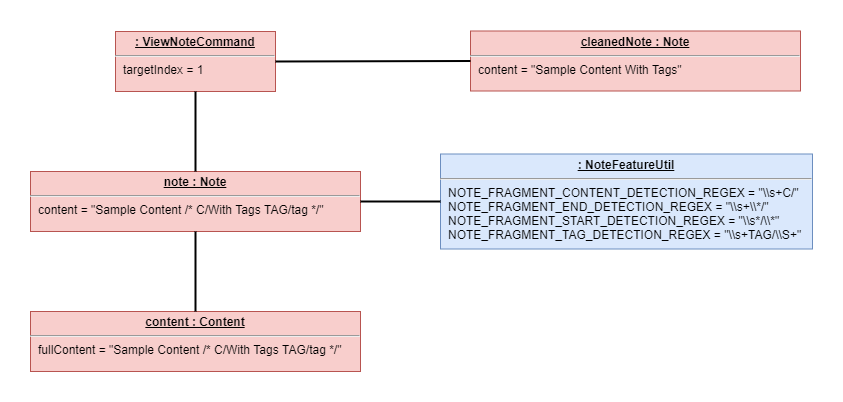
As can be seen from the diagram above, the Note object named 'note' makes use of the NoteFeatureUtil object and
its own Content object to return the cleaned content String to the ViewNoteCommand object. The ViewNoteCommand
object then creates a separate Note object named 'cleanedNote' to obtain the information to display.
This indicates that calling a ViewNoteCommand does not affect the original Note, as a separate Note object is
created instead.
4.7.5. Design Considerations of the Add Tags Within Notes feature and ViewNoteCommand
Aspect: Container location for NoteFragment
-
Alternative 1 (current choice): Each
Notecontains aList<NoteFragment>:-
Pros: Much easier maintenance, since
NoteFragmentsare automatically deleted with the deletion of their parentNote. -
Cons: O(n2) search time for
filtercommands, as allNoteFragmentsin eachNotein theUniqueNoteListmust be searched through to filter them out.
-
-
Alternative 2: Separate
UniqueNoteFragmentListfromUniqueNoteList:-
Pros: O(n) search time for
filtercommands, as theUniqueNoteFragmentListexists separately from theUniqueNoteList. -
Cons: Difficult to maintain; deletion of a parent
Noterequires searching theUniqueNoteFragmentListfor any childNoteFragmentsto delete as well.
-
Aspect: Implementation of ViewNoteCommand
-
Alternative 1 (current choice): Create a method
Note#getContentCleanedFromTags()that also returns a Content:-
Pros: Allows
Noteto remain as the sole point of interaction between the otherNoteclasses (specificallyContentandTags). -
Cons: Is more complicated as
Contentmust be converted to String before manipulation.
-
-
Alternative 2: Create a method
Content#getContentCleanedFromTags()that returns a cleaned copy of itself.-
Pros: Can manipulate the String of the
Contentdirectly without having to convert it to and fromContent. -
Cons: Breaks the Single Responsibility Principle, as
Contentwill now be dependent onTags, even though it does not useTags.
-
4.7.6. Usages of the Add Tags Within Notes feature
Generally, the Add Tags Within Notes feature allows for more precise filtering of Notes and their contents. Since
Notes may be very long, this feature allows the user to highlight certain portions of the Notes in order to take
out only the more important parts for CheatSheet creation. The user can still use the full Content of the Note
for general revision.
As such, the main usages of this feature can be summarized as follows:
-
Saves space when using
addforCheatSheets -
Highlights specific sections of
Noteswhen usingfilter -
Makes the GUI less cluttered when using
filterandfilterall
4.7.7. (Proposed) Future Improvements for v2.0
edit command for Notes
This feature will allow for users to edit their Notes, by specifying a new Title, Content, or Tags.
(Proposed) Implementation
-
Expected inputs:
-
The original
Titleof theNoteto be edited -
One or more fields that the user wants to edit
-
-
Create an
EditCommandParserto parse the input command usingArgumentTokenizer -
Create an
EditCommandwhich containsEditCommand#execute()-
This method creates a new
Notewhich contains all old fields, then replaces any old field with a new field, if it is made available
-
Example usage:
edit Old Title t/New Title
This would result in the Note which was originally called 'Old Title' having its Title changed to 'New Title'.
Since no two Notes are allowed to have the same Title, it is a unique identifier of the Note to be edited.
Design Considerations
Aspect: Method of editing
-
Alternative 1: Create a new
Noteobject-
Pros: Is more defensive, since only a shallow copy of the
Noteobject is returned. -
Cons: Longer command run time, as a new
Noteobject needs to be created first, and then edited.
-
-
Alternative 2: Edit the exiting
Noteobject-
Pros: Command will run faster, since no new
Noteobject needs to be created. -
Cons: Is not defensively programmed, as
Notesshould be immutable.
-
5. Documentation
Please do refer to the guide here for more information about this section!
6. Testing
Please do refer to the guide here for more information about this section!
7. Dev Ops
Please do refer to the guide here for more information about this section!
8. Appendixes
The following sections will be titled as 'Appendix' followed by an alphabet in alphabetical order to denote the different appendixes. The following is an example of an appendix heading.
Appendix Z: ABC
-
Alphabet 'Z' indicates its placing in the order of appendixes
-
Phrase 'ABC' indicates the title of the appendix
Appendix A: Product Scope
Target user profile:
-
is a Computer Science major student in NUS
-
is a visual learner that benefits from using flashcards
-
can benefit from better organization of notes
-
prefer desktop apps over other types
-
can type fast
-
prefers typing over mouse input
-
is reasonably comfortable using CLI apps
Value proposition: integrate flashcards and note compilers for CS students better than a typical mouse/GUI driven app
Appendix B: User Stories
Priorities: High (must have) - * * *, Medium (nice to have) - * *, Low (unlikely to have) - *
| Priority | As a … | I want to … | So that I can… |
|---|---|---|---|
|
user |
have as much information on hand as possible |
get all the information I have collected and tagged as part of my revision and ensure that I have all the necessary information at hand. |
|
user |
save time in creating cheatsheet |
spend more time on revision |
|
user |
tailor the information I have in my cheatsheet |
choose which types of tags I want to include in my cheatsheet. |
|
user |
familiarise with some common programs from the pre-set flashcards in the question bank |
learn more useful tips and snippets of information |
|
user |
quickly store tutorial questions for revision |
just store a screenshot of the question for future reference |
|
user |
lighten the weight of my bag |
cure my back pain from carrying a heavy bag and still store my notes conveniently. |
|
user |
find my notes efficiently for reference |
write as much notes as possible during studies without worries |
|
user who constantly misplace notes |
keep myself more organized |
effectively see what notes are missing |
|
user |
sort and skim through long lists of notes quickly |
take notes during class without missing out important pointers |
|
user |
take charge of my learning by having multiple “filters” or “levels” to my learning |
be a proactive learner |
|
user who is forgetful |
practice spaced retention |
better memorize and recall the topics |
|
user |
better understand or memorize the topics |
improve my results |
|
university educator teaching multiple modules |
easily categorize and organize the notes I create for my students |
easily search by the tags for relevant notes |
|
user |
make cheatsheets from exams |
organize and collate the best pointers to be made into a cheatsheet |
|
user |
creatively create and implement notes |
be more effective with my studies |
|
user |
not take break for too long |
be effective with my revision using the pomodoro technique |
|
user |
have suggestions on what to do during breaks |
be more productive and on-track with tasks |
|
user |
make sure that my notes doesn’t miss out important points |
collate and compare my notes with my friends’ efficiently |
|
user |
be reminded at appropriate times to revise my work |
revise regularly and consistently |
|
user |
disseminate information efficiently |
save the work amongst different teammates |
|
user |
better understand or memorize the topics |
improve my results |
|
user |
connect different parts of questions together |
easily link concepts together |
|
user |
share notes with my friends and for them to share notes with me, for ease of discussion |
be able to study with others |
|
user |
answer the questions within a certain time frame |
boost my confidence and proficiency in a subject |
|
user |
keep track of the harder questions |
revise more effectively |
|
university educator |
keep track of my students' progress and evaluate who are the stronger/weaker students so they can help each other |
help my students do well in their studies |
|
university educator |
distribute the flashcards I create to my students so they can use them to practice |
help my students better memorise and recall my class content |
|
university educator |
give my students quizzes during lecture using the flashcards |
make sure that they will not fall asleep during lecture. |
|
user |
download flashcards from online sources |
save time for other revisions |
|
user |
create notes without papers |
save the earth |
Appendix C: Use Cases
(For all use cases below, the System is the StudyBuddyPro and the Actor is the user, unless specified otherwise)
User story 1:
As a student who is busy with revision and has no time to create a cheatsheet, the cheatsheet generation feature will help me save time on creating cheatsheets and let me spend more time on revision.
Use case: UC01 – Create a cheatsheet
Preconditions: StuddyBuddy application is opened
MSS
-
User navigates to cheetsheat section.
-
User chooses to create new cheatsheet.
-
StuddyBuddy asks user for new cheatsheet’s title.
-
User inputs new cheatsheet’s title.
-
StuddyBuddy asks user for new cheatsheet’s module.
-
User inputs new cheatsheet’s module.
-
StuddyBuddy asks for new cheatsheet’s tags.
-
User inputs new cheatsheet’s tags.
Use case ends
Use case: UC02 – List cheatsheets
Preconditions: StuddyBuddy application is opened
MSS
-
User navigates to cheetsheat section.
-
User chooses to list all cheatsheet.
-
StudyBuddyPro displays all cheatsheets.
Use case ends.
Use case: UC03 – Edit a cheatsheet
Preconditions: StudyBuddyPro application is opened, User knows cheatsheet ID
MSS
-
User navigates to cheetsheet section.
-
User chooses to edit cheatsheet.
-
StudyBuddyPro asks for cheatsheet ID for cheatsheet to be edited.
-
User inputs cheatsheet ID.
-
StudyBuddyPro asks for parameters to be edited.
-
User inputs perimeters to be edited.
-
StudyBuddyPro displays edited cheatsheet.
Use case ends.
Use case: UC04 – View a cheatsheet
Preconditions: StudyBuddyPro application is opened, User knows cheatsheet ID
MSS
-
User navigates to cheetsheat section.
-
User chooses to view cheatsheet.
-
StudyBuddyPro asks for cheatsheet ID for cheatsheet to be viewed.
-
User inputs cheatsheet ID.
-
StudyBuddyPro displays cheatsheet.
Use case ends.
C.1. Use case: User story 1
MSS
-
User creates cheatsheet (UC01).
-
User views cheatsheet (UC04).
Use case ends.
Proposed Extensions
-
2a. User chooses to edit cheatsheet.
2a1. User edits cheatsheet (UC03).
Use case ends.
User story 2:
As a student who finds it very cumbersome to store tutorial questions that I would like to revise, I can make use of the flashcard function to just store a screenshot of the question for future reference.
Use case: UC05 – Create a flashcard from image
Software system: StudyBuddyPro, OS
Preconditions: StudyBuddyPro application is opened
MSS
-
User finds a tutorial question he/she would like to revise.
-
User takes screenshot of tutorial question.
-
OS asks user where screenshot should be saved.
-
User saves screenshot in designated StudyBuddyPro image folder with custom name.
-
User opens StudyBuddyPro application.
-
User navigates to flashcard section.
-
User chooses to create new flashcard from image source.
-
StudyBuddyPro asks user for file name.
-
User inputs file name.
-
StudyBuddyPro asks user for flashcard’s answer.
-
User inputs flashcard’s answer.
-
StudyBuddyPro asks user for flashcard’s title.
-
User inputs flashcard’s title.
-
StudyBuddyPro asks user for flashcard’s module.
-
User inputs flashcard’s module.
-
StudyBuddyPro displays created flashcard.
Use case ends.
Use case: UC06 – Start time trial
MSS
-
User navigates to flashcard section.
-
User chooses to start time trial.
-
StudyBuddyPro asks user for time per flashcard.
-
User inputs time per flashcard.
-
StudyBuddyPro asks user for tags to select flashcards for inclusion.
-
User inputs tags.
-
StudyBuddyPro starts time trial with specified parameters.
Use case ends.
Appendix D: Non Functional Requirements
-
Should work on any mainstream OS as long as it has Java
11or above installed. -
A flashcard cannot have more than 10 tags.
-
The product is not required to confirm if the user has answered the flashcard correctly. Instead, the product lets the user checks the answer and determine himself/herself if he/she has answered it correctly.
-
The in-built flashcard library is expected to be updated annually, to follow the curriculum of NUS computing modules.
-
The command-line syntax should prioritise user-friendliness.
{More to be added}
Appendix E: Glossary
- Mainstream OS
-
Windows, Linux, Unix, OS-X
- FlashCard
-
A titled digital 'card' that contains a question (image or text), answer, as well as its relevant tags.
- Cheatsheet
-
A document that contains the notes the user has specified during creation
- Time-Trial
-
A mode of answering flashcards in which you must provide the answer within a designated time period.
Appendix F: Instructions for Manual Testing
Given below are instructions to test the app manually.
| These instructions only provide a starting point for testers to work on; testers are expected to do more exploratory testing. |
F.1. Launch and Shutdown
-
Initial launch
-
Download the jar file and copy into an empty folder
-
Double-click the jar file
Expected: Shows the GUI with a set of sample flashcards and notes. The window size may not be optimum.
-
-
Saving window preferences
-
Resize the window to an optimum size. Move the window to a different location. Close the window.
-
Re-launch the app by double-clicking the jar file.
Expected: The most recent window size and location is retained.
-
F.2. Remind Feature
|
Refer to the note at the start of the Remind feature section for an explanation of the terms "due flashcards" and "overdue flashcards" used in this section. |
Testing this section may require the user to switch their system date. A quick guide on how this can be done for the Windows 10 operating system can be found here while one for Mac can be found here. The process should be similar for different versions of the operating systems.
-
Testing
remindcommand-
Test case 1
-
Prerequisites
-
Currently in flashcard mode with Flashcard icon highlighted.
-
There are no due or overdue flashcards.
-
-
Test command:
remind -
Expected: Feedback box outputs message:
Well done - No due or overdue flashcards!
-
-
Test case 2
-
Prerequisites
-
Currently in notes or cheatsheet mode with the respective icon highlighted.
-
-
Test command:
remind -
Expected: Feedback box outputs message:
Unknown command
-
-
Test case 3
-
Prerequisites
-
Currently in flashcard mode with the Flashcard icon highlighted.
-
There are due flashcards. This can be simulated by adding a flashcard with the
addcommand and then changing the system date to the next day.
-
-
Test command:
remind -
Expected: Feedback box outputs message:
Here are the flashcards due today:
1. [FLASHCARD TITLE] - [FLASHCARD ANSWER]"
-
-
Test case 4
-
Prerequisites
-
Currently in flashcard mode with the Flashcard icon highlighted.
-
There are overdue flashcards. This can be simulated by adding a flashcard with the
addcommand and then changing the system date to 2 days later.
-
-
Test command:
remind -
Expected: Feedback box outputs message:
Here are your overdue flashcards:
1. [FLASHCARD TITLE] - [FLASHCARD ANSWER] (Was due on YYYY-MM-DD)"
-
-
Test case 5
-
Prerequisites
-
Currently in flashcard mode with the Flashcard icon highlighted.
-
There are overdue flashcards but no due flashcards. This can be simulated by the following steps:
-
Add a flashcard (Called flashcard A) with the
addcommand. -
Add a flashcard (Called flashcard B) with the
addcommand. -
Switch the system date to 2 days later. Both flashcards A and B are now overdue. This can be verified by using the
remindcommand at this stage. -
View flashcard A using the
view 1command and then show its answer with theshowcommand. This means flahscard A is no longer overdue. Now there are no due flashcards today and one overdue flashcard (flashcard B).
-
-
-
Test command:
remind -
Expected: Feedback box outputs message:
Here are your overdue flashcards:
1. [FLASHCARD TITLE] - [FLASHCARD ANSWER] (Was due on [YYYY-MM-DD])
-
Note how only the overdue flashcard B was shown while no explicit output was provided to indicate there were no other flashcards due today. This is an intended behaviour to avoid clutter.
-
-
Test case 6
-
Prerequisites
-
Currently in flashcard mode with the Flashcard icon highlighted.
-
There are both due and overdue flashcards. This can be simulated by the following steps:
-
Add a flashcard (Called flashcard A) with the
addcommand. -
Switch the system date to 1 day later. Flashcard A is now due. This can be verified by using the
remindcommand at this stage. -
Add a flashcard (Called flashcard B) with the
addcommand. -
Switch the system date to 1 day later. Flashcard A is now overdue while flashcard B is due.
-
-
-
Test command:
remind -
Expected: Feedback box outputs message:
Here are the flashcards due today:
1. [FLASHCARD TITLE] - [FLASHCARD ANSWER]
Here are your overdue flashcards:
1. [FLASHCARD TITLE] - [FLASHCARD ANSWER] (Was due on [YYYY-MM-DD])
-
Note how flashcard B is listed under due today while flashcard A is listed under overdue flashcards.
-
-
-
Testing
timetrialcommand
The following commands have been provided for ease of testing and can be inputted to test some of the test cases:
-
add q/Question 1 a/Answer 1 t/q1 tag/test
-
add q/Question 2 a/Answer 2 t/q2 tag/test
-
Test case 1
-
Prerequisites
-
Currently in flashcard mode with the Flashcard icon highlighted.
-
There exist flashcards with the tags that you would like to specify.
-
-
Input command:
timetrial [tag] -
Expected:
-
Feedback box outputs:
Time trial started
-
The question of the flashcard is displayed together with a timer for 5 seconds.
-
Once the time hits 0, the answer is flashed for 3 seconds.
-
Repeat 2 and 3 until all of the flashcards of the specified tags have been displayed.
-
-
-
Test case 2
-
Prerequisites
-
Currently in flashcard mode with the Flashcard icon highlighted.
-
There exist flashcards with the tags that you would like to specify.
-
-
Input command:
timetrial [tag]. -
Input command:
show. -
Expected:
-
Feedback box outputs:
Flashcard answer loaded
-
The answer of the flashcard is loaded, and after a while the time trial continues until all the flashcards have been loaded.
-
-
-
Test case 3
-
Prerequisites
-
Currently in flashcard mode with the Flashcard icon highlighted.
-
There exist flashcards with the tags that you would like to specify.
-
-
Input command:
timetrial [tag]. -
Input command:
view 3(Can be any other flashcard comamand). -
Expected:
-
Feedback box outputs:
Viewing flashcard:  Title: (Flashcard title)
Tags: [tags]
-
Time trial does not continue and the latest command inputted is executed.
-
-
-
Test case 4
-
Prerequisites
-
Currently in flashcard mode with the Flashcard icon highlighted.
-
There are no flashcards with the tags that you would like to specify.
-
-
Input command:
timetrial [tag]. -
Expected:
-
Feedback box outputs:
There are no flashcards with the tags specified!
-
-
3) Testing exit command
-
Test case 1
-
Prerequisites
-
StudyBuddyPro just launched with no mode selected. GUI does not show any icon highlighted.
-
There are due flashcards. Refer to Remind command manual testing, specifically test cases 3, for how this can be simulated.
-
-
Test command:
exit -
Expected: Feedback box outputs message:
Are you sure you want to exit? You still have the following flashcards overdue or left to revise for today:
Here are the flashcards due today:
1. [FLASHCARD TITLE] - [FLASHCARD QUESTION]
Type 'exit' again to exit the application!
-
Pressing Enter exits StudyBuddyPro. This also highlights how the this sub-feature of the remind feature works regardless of which mode the user is in since
exitis a global command. -
Alternatively, the user can switch back to flashcard mode using
switch fc, view the added flashcard and its answer usingview 1andshow, before usingexitagain. This time StudyBuddyPro exits immediately since now there are no due or overdue flashcards.
-
-
Test case 2
-
Prerequisites
-
Currently in flashcard mode with the Flashcard icon highlighted.
-
There 1 due and 1 overdue flashcard. Refer to Remind command manual testing, specifically test cases 6, for how this can be simulated.
-
-
Test command:
exit -
Expected: Feedback box outputs message:
Are you sure you want to exit? You still have the following flashcards overdue or left to revise for today:
Here are the flashcards due today:
1. [FLASHCARD TITLE] - [FLASHCARD QUESTION]
Here are your overdue flashcards:
1. [FLASHCARD TITLE] - [FLASHCARD ANSWER] (Was due on [YYYY-MM-DD])
Type 'exit' again to exit the application!
-
Enter another generic command e.g.
switch notes. Now, entering the test commandexitwill prompt the same feedback as shown above in part c. This highlights how entering another valid command will refresh the "state" of the exit command which again requires a double-confirmation before the user can exit StudyBuddyPro.-
Combination testing:
remindandexitcommand withtimetrial
-
-
-
Test case 1
-
Prerequisites
-
Currently in flashcard mode with the Flashcard icon highlighted.
-
There 1 due and 1 overdue flashcard. Refer to Remind command manual testing, specifically test cases 6, for how this can be simulated. Ensure the flashcard due today is tagged with the tag "pop". For example, the flashcard could be added with the command:
add q/What is 1+1? a/2 t/Math Question 1 tag/pop.
-
-
Test command:
remind -
Expected: Feedback box outputs message:
Here are the flashcards due today:
1. [FLASHCARD TITLE] - [FLASHCARD ANSWER]
Here are your overdue flashcards:
1. [FLASHCARD TITLE] - [FLASHCARD ANSWER] (Was due on [YYYY-MM-DD])
-
Start a timetrial with the flashcard that is due today i.e. tagged with "pop" using the command
timetrial pop -
Test command:
exit -
Expected: Feedback box outputs message:
Are you sure you want to exit? You still have the following flashcards overdue or left to revise for today:
Here are the flashcards due today:
1. [FLASHCARD TITLE] - [FLASHCARD QUESTION]
Type 'exit' again to exit the application!
-
This highlights how the flashcard that was due today (tagged with "pop") was updated when it was viewed during the timetrial and was no longer considered due. Thus, when the user tried to exit, only the one overdue flashcard which was still not viewed was flagged.
-
F.3. Add Tags Within Notes feature
| Refer to the Note add section of the User Guide for a reminder of the syntax used. |
-
Testing of Note
add-
Test case 1
-
Prerequisites
-
Currently in notes mode
-
-
Test command:
add t/Sample Title c/Sample Content /* C/with a note fragment tag. TAG/insidetag */ tag/outsidetag -
Expected result: Feedback box outputs message:
-
-
New note added:
    Title: Sample Title
    Content: Sample Content /* C/with a note fragment tag. TAG/insidetag */
    Tags: [outsidetag]

Note fragment tags detected:
    Title: Sample Title
    Content: with a note fragment tag.
Tags: [insidetag]-
Test case 2
-
Prerequisites
-
Currently in notes mode
-
-
Test command:
add t/Sample Title c/Sample Content without any note fragment tags. tag/outsidetag -
Expected result: Feedback box outputs message:
-
New note added:
	Title: Sample Title
	Content: Sample Content without any note fragment tags.
	Tags: [outsidetag]

The added Note has no detected note fragment tags!-
Testing of Note
view-
Test case 1
-
Prerequisites
-
Currently in notes mode
-
Have a cleared StudyBuddyPro, with a note added as above in Test case 1 of "Testing of Note
add"
-
-
Test command:
view 1 -
Expected result: Feedback box outputs message:
-
-
Viewing note:
	Title: Sample Title
	Content: Sample Content WITH A NOTE FRAGMENT TAG.
Tags: [outsidetag]-
Test case 2
-
Prerequisites
-
Currently in notes mode
-
Have a cleared StudyBuddyPro, with a note added as above in Test case 1 of "Testing of Note
add"
-
-
Test command:
viewraw 1 -
Expected result: Feedback box outputs message:
Viewing raw note:
	Title: Sample Title
	Content: Sample Content /* C/with a note fragment tag. TAG/insidetag */
	Tags: [outsidetag]
F.4. Auto-generation Feature of Cheatsheet
|
Do take a look at the section on automation of cheatsheet above for more information of how the feature works! |
-
Testing
addcommand-
Test case 1
-
Prerequisites
-
In Flashcard and Notes features, there exist 2 objects in total that is tagged
manualtesting. -
Currently in cheatsheet mode with Cheatsheet icon highlighted.
-
-
Test command:
addwithtitleasManual Testingandtagasmanualtesting. -
Expected: Feedback box outputs message:
New cheatsheet added:  Title: Manual Testing
Tags: [manualtesting]
2 content(s) have been successfully generated from the other modes.
-
-